(in-ep-toc'-ra-cy) - a system of government where the
least capable to lead are elected by the least capable of producing,
and where the members of society least likely to sustain themselves
or succeed, are rewarded with goods and services paid for by the
confiscated wealth of a diminishing number of producers.
Tuesday, December 25, 2012
Sunday, December 23, 2012
How It Always Plays Out
1) Some mentally ill person completely ignores existing gun laws and shoots a bunch of people---unless one of those people also has a gun and knows how to use it, then it never makes the news.
2) The nation mourns the losses.
3) Demands are made for meaningful gun control legislation.
4) Firearms sales go through the roof.
End result---more guns in circulation. New laws enacted that only the law abiding folks pay attention to. Root problem of mental illness not even addressed. People who were already very well armed have more guns. That important margin of good people who might be present to step up, with the ability to properly administer lethal force, try to find some middle ground instead.
Guns are not the problem, just the method. As long as we as a society cheapen the value of life, and treat it as something individuals do not have a personal obligation to protect---be it a pregnant unwed teen, festering gang activity, drug and alcohol abuse, or groups of children protected by only unarmed adults, this sort of thing will increase in frequency.
A good friend works with the 'frequent flyer' 911 abusers. It's very clear that what's missing is proper mental health facilities. A great many of the homeless are simply incapable of fending for themselves, and use 911 as a way to easily get some level of intervention. What's needed is good profiling of citizens---citizens identified by parents, family, teachers, medical professionals, and law enforcement. Make these people feel like they matter, like their life has worth, and it will do far more to prevent these tragedies than banning some particular form of firearm or some capacity of magazine. Identifying the mentally ill people who actually pose a threat to society and taking custody of them is a reasonable infringement of liberty, but the groups that fight that are often the same groups that have no problem infringing upon responsible firearms owners.
Monday, December 10, 2012
Turning Around At The Summit
I'm in a sort of odd place. AnnaMarie picked up on it and asked if anything was wrong. There's a lot wrong, but there's a lot right, too.
Remember in Chariots Of Fire after he (spoiler alert) won? It's kind of like that. Now, I know many, many people have built houses, there's nothing history-making about it. But I just finished a four year project. I pulled out of AnnaMarie what her idea of the perfect cottage was. I went ot sleep thinking about how to accomplish the next task, balanced overtime at work so I could fund the project without debt, channelled resources, worked quite a few 16 hour days.
Now it's done.
Towards the end it was a real struggle to push through the last bit but I had to finish by November 13th---it marked 3 years from the time they issued the building permit. I was swearing this is the last major building project---I'd never go through all this again.
Did I say that last time too? I do remember feeling like this when the cabin was completed back in 2003. It was cured by the Cedar Fire ripping through our neighborhood; the sense of relief of having both our homes spared when most of those around us burned up put an end to foolish melancholy. I'd be OK with skipping that this time around though.
There's a big hole now in my time. Every spare moment was spent doing something towards getting the cottage built. Sure, there's tons of stuff needing attention now, and without a built in excuse I have to attend to them.
I'm going to miss the logistics and planning. I'm going to miss the feeling of looking at what got accomplished by days' end. I'm going to miss time spent building with the occaisonal helpers----Mike, Jim, especially Byron. Most of all I'm going to miss putting decisions in front of AnnaMarie, thrying to explain options without influencing her choices, then showing her the finished product. Things are turned around now that she's doing decorating---I get to see what she's created.
We've spent the night there once. Awesome. We were supposed to have date night in a Temecula hotel tomorrow too but we both decided we'd rather be at her cottage, so we're doing that instead. She really made my day while I was in DC---she wasn't feeling well and I couldn't be there. She made her way to the bedroom at her cottage and crawled into bed there.
I was in a meeting that went well past my 10 minute attention span. I caught myself sketching ideas for house plans....
Sunday, December 2, 2012
Is There A Workaround?
When people get things for free, we feel very put out when that free thing is taken away from us. Human nature I suppose, linking back to crying when we're getting weaned.
I can no longer post pictures here on my blog; I have axceeded my 1 gig of photo space. I have some awesome pictures.
Dear Blogger People---I love blogging, it's a great outlet---Also I'm a free market guy and understand you wanting to profit from my posts. However, to actually pay for for picture data space would be admitting I have a blogging problem. Like missing work to go drink. I'm not gonna cross that line.
So, why don't you sell some banner space on my blog. The people who read it will buy whatever they are selling. Then, let me post pics again---at least 15 people read this blog and they all are consumers.
Wednesday, November 14, 2012
NOW What Am I Supposed To Do?
Got the final inspection for AnnaMarie's cottage today. I was at work but AnaMarie knew what to tell him....there are still a few little things, like the trench for the phone line and checking all the propane appliances but it is as of now a legally habitable structure.
It's in AnnaMarie's name. It's hers to do whatever she wants with. She's decorating right now---I haven't seen her this excited in a long time. Late last night I prematurely moved all the furniture in (you're not supposed to before the final but now she can start placing all her treasures whe's been accumulating around)
The first place we built, I put a lot of effort making it my idea of the perfect cabin for that space. I learned lots about what my style is. So the challenge this time was to pull out of AnnaMarie what HER idea of the perfect place is. It took awhile before she was able to picture things, and not just say what she thought I wanted to hear. I learned how to present decisions to her so they weren't overwhelming, but not influencing, either. By the end of this project she had figured out a direction and knew exactly what she wanted. It's going to be fun seeing what she does with it from here.
The other houses are a bit neglected at this point. Our main residence really needs exterior paint, bathroom remodels, new carpet. The beach house will slide off the bluff soon thanks to industrious ground squirrels unless I build a retainer. Our tenants at the cabin want a laundry room built. What's missing though is any sort of deadline. I can go to Patrick's soccer games. I'm going to become a familiar face at church again. Lauren needs driving lessons. McKenna needs college funding and the overtime's available.
Speaking of funding---when I go back through bank statements it's astounding what it costs to buy a house one piece at a time. More often than not, I'd stop at a hardware store on the way home from work and spend a few hundred dollars. The expense of owning this house is now down to upkeep, utility bills, insurance and taxes.
The one thing we didn't backburner through all this was date night. AM and I have always made date night a priority. Next date night, though, won't be a trip down the hill---it'll be right across the street at her new cottage.
Monday, November 12, 2012
Building Bridges
The final project necessary for completion before the final inspection is the bridge to the porch. I'd thought about where it would start, where it would end, and how it would be shaped for many months. Lately I'd been waffling about how complex to make it----I could do a 'just get it done' design of a couple steps down to dirt in a few hours. I talked myself out of that though.
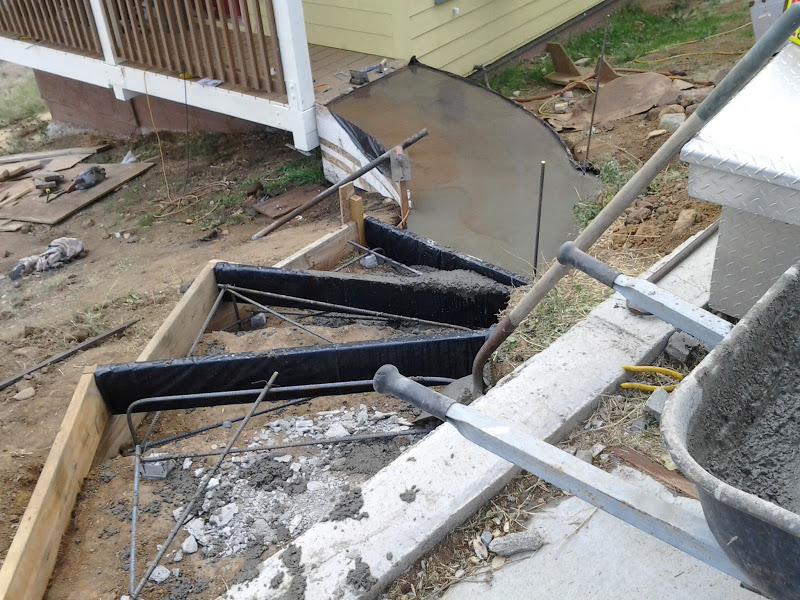
Here's the difficulty---I wanted the bridge to curve, going uphill, on an off-camber slope. So I started by digging two footings down to the hardpan, at angles to each other. I poured concrete in those with lots of rebar and bent rebar from one to the other so the finished bridge would be well anchored. then I figured out the midpoint between the two and put a 40" board on the ground there, and dug it in and wedged it until it was level. Then my forms were built from each footing to that board. The 'joists' were in first, then the form boards on top were just set on them (with angles ripped so they'd fit tight like a barrel) Then I scribed a line on those that followed the curve I wanted, cut them and screwed them down---with screws just long enough so they wouldn't move. I knew I'd have to demolish my forms from underneath so shorter screws made sense.

 I'm kind of wishing I took more pictures of forming the bridge now. Anyway I watched the arch curve towards the porch. The trick there was forming it so it didn't push against the porch beam, making removal of the form impossible. I screwed it down from the top with a 2x6 that also served to form a pocket for the first deck board to rest its edge in. Bending the plywood and screwing it into the bridge form was hard. Then large stones got mortared against the forms. I decided not to use stones on the edge of the bridge itself---I wanted it pretty thin and thought the stones would weaken it too much, so I just colored it instead. Worse thing was, it started raining while I was mixing.
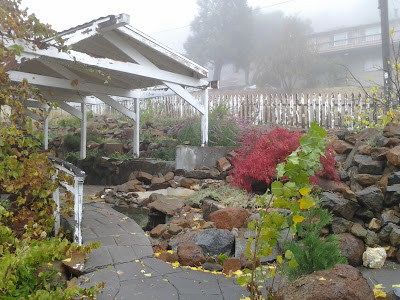 This picture made its way in here for a couple reasons. It's the first curved bridge I did, over our fishponds. Also you can see what the weather was like. Also to prove SoCal can get fall colors. Also you can see the neglect our pavilion and fence have faced since I've been building. (The cottage project is across the street, behind this pavilion. You'd see the roof but for the fog)

The rain didn't ruin anything---it just made the surface rough, not a bad thing for a foot path. You can see the color mixed in so it'll match the hearth inside. Although I milked it with AnnaMarie, it was actually great weather to mix concrete in----hot and dry is far worse, lugging 90# sacks of concrete, breathing the dust, and misting the stuff that's already mixed so it doesn't dehydrate too fast.


 The wooden box things are forms for the retaining wall. It will look just like the ones in the backbround with native stones between the pillars. This will form a planting area next to the walkway.
Here's the difficulty---I wanted the bridge to curve, going uphill, on an off-camber slope. So I started by digging two footings down to the hardpan, at angles to each other. I poured concrete in those with lots of rebar and bent rebar from one to the other so the finished bridge would be well anchored. then I figured out the midpoint between the two and put a 40" board on the ground there, and dug it in and wedged it until it was level. Then my forms were built from each footing to that board. The 'joists' were in first, then the form boards on top were just set on them (with angles ripped so they'd fit tight like a barrel) Then I scribed a line on those that followed the curve I wanted, cut them and screwed them down---with screws just long enough so they wouldn't move. I knew I'd have to demolish my forms from underneath so shorter screws made sense.


The rain didn't ruin anything---it just made the surface rough, not a bad thing for a foot path. You can see the color mixed in so it'll match the hearth inside. Although I milked it with AnnaMarie, it was actually great weather to mix concrete in----hot and dry is far worse, lugging 90# sacks of concrete, breathing the dust, and misting the stuff that's already mixed so it doesn't dehydrate too fast.
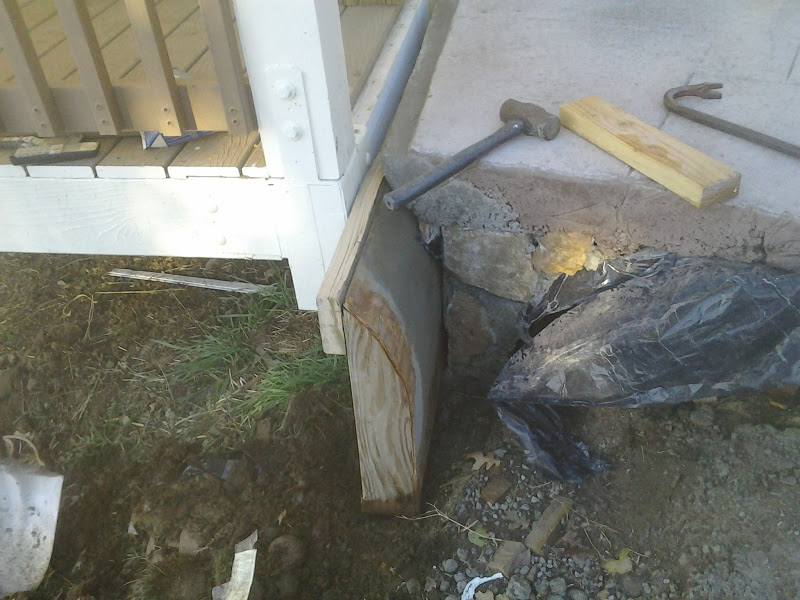
So this is stripping the forms. This one was pinned to the ground with lag bolts pounded in from under the deck. Wedges from underneath kept it off the beam, and that 2x6 screwed from the top kept it away too. You can see how the deck board will drop right in there. It's a smooth transition from concrete to deck. After pulling the pins out, it just got pounded out from the other side. The main bridge form, I just kept whacking the joists to smithereens with the digging bar. Once one form board came out the rest just fell. (The whole thing was lined with plastic for a smooth finish and to help with this stage)


Monday, November 5, 2012
More Finished Stuff
Here's a better pic of the bedroom floor, all finished except for the brown caulk that will go in all the seams---I'm saving that for an after dark project now that it seems to be night right after lunch
 Same deal with the staircase. All done except for caulk---I want a bead of caulk in all the corners so when I sweep the dirt can't jam under the little crack
 The ends are all trimmed with jacareuba. I really wanted to make the treads out of jacareuba but I couldn't cut boards big and flat enough---after ruining the bearings on a friend's band saw, I ended up with enough for the landing, I'll have to settle for that
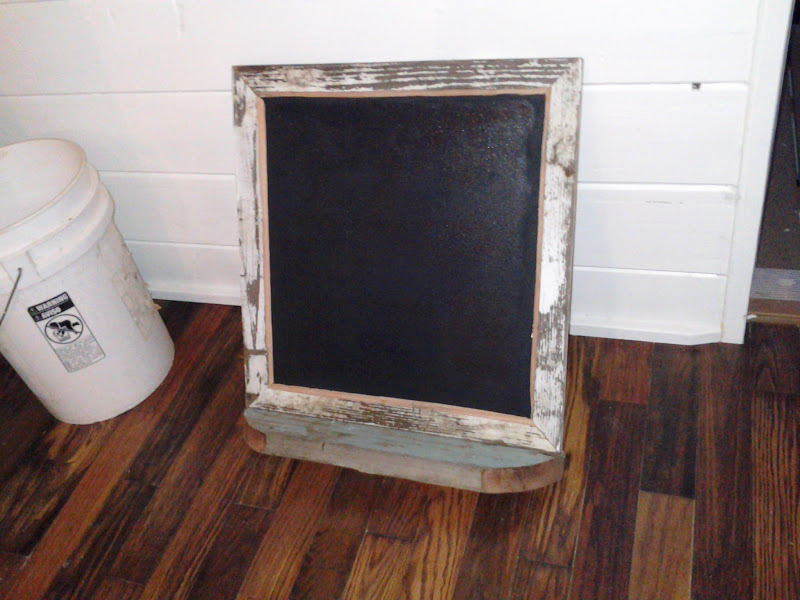
 AnnaMarie wanted a chalkboard for the kitchen. She knew what she wanted and we couldn't find it anywhere, like the bedroom floor. She wanted something framed with 'old white paint'. I bought the chalkboard paint----if you ever use that stuff plan on three coats minimum sanding in between
 I went down to the lake and crawled around under the 120 year old boat house and found this 4x4 lying on a stack of old wood. AnnaMarie did the chalk paint, and decided she wanted a couple of the inside of the tallest cabinet door chalkboard too to keep a grocery list. So I decided the inside of one of the doors for the liquor cabinet should be chalkboard too.


Saturday, November 3, 2012
A Smart Foreperson
AnnaMarie's cottage has to be completed by November 20th or the permit expires. I made trades at work to have a bunch of days off in a row---only to get called back to work for a bit. Two things left to finish for the final---the concrete bridge to the front porch and all the cleanup of the site. No problem!
Except----AnnaMarie said to get all the little finish stuff inside done first. Base moulding, door handles, little trim pieces, etc. Biggest was the bedroom floor. I think she knew once I had the final inspection in hand work would slow WAAAAYY down. Smart.
Choosing the bedroom floor was a struggle. The rest of the house has that 40+ year old solid oak we found for next to nothing on Craigslist, so to drop Ikea Tundra floor in the bedroom would have looked cheap. We had two trips down the hill to look at different floors. The ones she liked were dark gray with some brown, and were about $7 a square foot, and she didn't really love them, they were just O.K.
The bedroom isn't a main thoroughfare so walking traffic is light. I thought we might get away with using a softwood so I bought three different widths of white spruce and let it acclimate for a week. First it got cut to size then biscuit joined to the next board---this will prevent cupping over time.
 Next, it got a good sanding since each board was a little different thickness. The boards were glued down with heavy duty construction adhesive then screwed down tight. AnnaMarie filled all the screw holes while I got the base moulding cut to size.
 The slight gaps are unavoidable. They get filled with flexible caulk after the varnish cures. Since she wanted a gray floor with brown in it, I burnished the whole thing with a propane torch and simultaneously confirmed proper operation of the smoke detectors.
 Then the stain. I used Minwax ironically labelled "New Color! Classic Gray". It was allowed overnight to dry...(Sidenote---I started at 05:30 am on Halloween and finished the staining at half past midnight, listening to 'Coast to Coast' Halloween ghost story special. Her cottage is the exact opposite of a creepy mansion so it was impossible to get freaked out) then varnished with a semi-gloss, then sanded, and re-coated. This pic is between coats so the finished product is a little smoother and shinier and the roller marks all blended in---I'll post a finished picture later.
 AnnaMarie painted up the base mouldings too and I'll install that tomorrow when I get home from work. So I finally got a day to just dig for the bridge and footpath. AnnaMarie and Lauren gave the inside a much needed wipedown and cleanup, and when it got dark and chilly I didn't want them to go home because I appreciated the company so I got a fire going.

Except----AnnaMarie said to get all the little finish stuff inside done first. Base moulding, door handles, little trim pieces, etc. Biggest was the bedroom floor. I think she knew once I had the final inspection in hand work would slow WAAAAYY down. Smart.
Choosing the bedroom floor was a struggle. The rest of the house has that 40+ year old solid oak we found for next to nothing on Craigslist, so to drop Ikea Tundra floor in the bedroom would have looked cheap. We had two trips down the hill to look at different floors. The ones she liked were dark gray with some brown, and were about $7 a square foot, and she didn't really love them, they were just O.K.
The bedroom isn't a main thoroughfare so walking traffic is light. I thought we might get away with using a softwood so I bought three different widths of white spruce and let it acclimate for a week. First it got cut to size then biscuit joined to the next board---this will prevent cupping over time.


Tuesday, October 23, 2012
Treading Slowly
So much more work gets done when I have days off in a row, and I'm not between shifts. Typical between shift day---Get up (at AirOps) around 05:30 and take care of some end of shift things. Give a turn over to my relief sometime between 07:00 and 08:00. Go to hardware store. Call A.M. see what she needs me to pick up. Stop at WalMart/Target/Market/ whatever.
This time of year there's an awesome weather phenomena---it's wet and drizzly on the coast where work is. Then I drive up through the clouds to 5000' where it's clear and Autumn warm and Autumn colors.
Get home, unload groceries, take care of home stuff. THEN I can get over to build, usually if I get going by 10:00 I'm doing good. I had to get some painting done before putting the stairs together.
This was fun. All the little custom cut bits getting put together like a giant 3-D puzzle. I'm very glad I numbered the pieces....I tried to stain the treads so they looked like the floor. Next I biscuit joined the end trim of Jacareuba to the treads, glued and clamped them. I got a system going where a few treads were always clamped and setting while I worked on completing some stairs....After clamping they get a light sanding----I decided I'd install them first then put the final coat of varnish on, that way I wouldn't be too worried about nicks and cuts.
Here are two treads clamped; the kitchen drawers are in the background drying from their final coat of paint
 As is too often the case, once I got into a productive rhythm I had to quit. I had a lake board meeting I couldn't miss. I think I can finish the stairs with another full day...These few are done except for filling the screw holes. The treads are glued down with construction adhesive then screwed in place--the first step squeeks though because it flexes slightly rubbing against the wall. I couldn't back the screws out without damaging the surface of the step, but each of the other steps get adhesive where it meets the wall now, that seemed to fix the squeek
 The treads will look a bit better after the final coat of varnish. I really like how the oak/white/jacareuba tie everything together....I'm going to caulk all the seams so dirt can't get stuck in there
This time of year there's an awesome weather phenomena---it's wet and drizzly on the coast where work is. Then I drive up through the clouds to 5000' where it's clear and Autumn warm and Autumn colors.
Get home, unload groceries, take care of home stuff. THEN I can get over to build, usually if I get going by 10:00 I'm doing good. I had to get some painting done before putting the stairs together.
This was fun. All the little custom cut bits getting put together like a giant 3-D puzzle. I'm very glad I numbered the pieces....I tried to stain the treads so they looked like the floor. Next I biscuit joined the end trim of Jacareuba to the treads, glued and clamped them. I got a system going where a few treads were always clamped and setting while I worked on completing some stairs....After clamping they get a light sanding----I decided I'd install them first then put the final coat of varnish on, that way I wouldn't be too worried about nicks and cuts.
Here are two treads clamped; the kitchen drawers are in the background drying from their final coat of paint


Sunday, October 21, 2012
Dear Sandra...

Sometimes I think the ONLY form of liberty liberals understand and push for is sexual liberty.
Sandra---you really pose little threat---you drew a crowd of 10 people at the Obama rally. You aren't exactly a sex symbol either; it isn't so much the leftist crazy eyes or the man hands either---it has more to do with your outlook which could be very destructive. I'm sure you tell yourself men like me want to tell you what you can, and what you can't, do with your body. Please let me set the record straight.
As a Conservative, I believe 100% you have every right to do whatever you want with your body. If that's what 'liberty' means to you, well, have at it. Difference is, the consequences of your decisions are yours to bear, not mine, and not the most innocent among us whom I have no doubt you'd force me to pay for you to have aborted, and you wouldn't lose a wink of sleep over it.
You are to blame in part for our depressed economy. Time was, if a young man wanted sex, (I've heard quite a few do) the way to get it was 1) Learn a trade or get a degree 2) Establish an income 3) Get married. Sex is a great and powerful motivator. With women like you removing all consequences from sex, and requiring a commitment only from tax payers like me to pay for your birth control, abortions, treatment for STD's, or to raise any offspring fortunate enough to escape the knife, there is little motivation for a young man to better himself..
Turns out things like morality come from lessons learned by societies over and over again---not some random ritual necessary for eternal salvation. Sandra, this is probably way outside your wheelhouse, but imagine a world where all women got together and refused to have sex with anyone until they were willing to make a lifelong commitment towards you, and at very least could take responsibility for the expenses of birth control---more ideally, for the expenses of a family. Imagine that every single child born could look daily at a mother and a father that loved each other, and that child had a daily reminder they were a product of that love. Imagine if Family was the core basis of society and government took a way far backseat.
I hope you one day can look big picture at the cause you've cashed in your 15 minutes of fame for. Premarital sex, with the expenses forced on fellow citizens. Liberty isn't really about just doing whatever you feel. Liberty is the ability to make your own decisions, and reap the benefits of good ones and suffer the consequences of bad. Leveraging government to cushion the blow of the bad, and to leech off the benefits of other people's good decisions, is not liberty. Quite the opposite.
Friday, October 19, 2012
One Step At A Time
(Thanks BG for the tag line)
The staircase for the cottage is an important design element. It's the only thing you see whether you are upstairs or down. It has to be functional--there are more design requirements involving stairs than most people realize. Rise over run, max/min stair depth and height, head clearances, railing height, widths, distances, turns, loads, finishes, noses, lighting, etc, etc, etc.
It is also one of the final touches. We are so close to the final inspection it's tempting to make it 'good enough' but I'd regret it later. I really wanted the stair treads made out of the same Jacareuba that's become an impromptu theme throughout the cottage, but it was too difficult to cut slabs thick and true enough for that purpose. Instead I'm using 1" thick oak stock and staining it to match the 40 year old oak flooring we put down. The risers are just soft pine that will be painted the same white as the walls. The Jacareuba trims the ends and goes up under the tread bull nose; it will be finished with a clear varnish so will match the balusters. I did end up with enough straight, flat pieces of Jacareuba to do the landing---7 boards we milled from an old beam (before frying the band saw) that I carefully biscuit joined, clamped, and sanded. I'm going to wait until it's varnished before posting a pic of that. It's gorgeous.


So you have to sort of imagine the long piece that's sitting on the step goes up under the tread. In these pics they are all just set in place. Right now it's all taken apart, every bit numbered, and ready for paint/stain/varnish.
The staircase for the cottage is an important design element. It's the only thing you see whether you are upstairs or down. It has to be functional--there are more design requirements involving stairs than most people realize. Rise over run, max/min stair depth and height, head clearances, railing height, widths, distances, turns, loads, finishes, noses, lighting, etc, etc, etc.
It is also one of the final touches. We are so close to the final inspection it's tempting to make it 'good enough' but I'd regret it later. I really wanted the stair treads made out of the same Jacareuba that's become an impromptu theme throughout the cottage, but it was too difficult to cut slabs thick and true enough for that purpose. Instead I'm using 1" thick oak stock and staining it to match the 40 year old oak flooring we put down. The risers are just soft pine that will be painted the same white as the walls. The Jacareuba trims the ends and goes up under the tread bull nose; it will be finished with a clear varnish so will match the balusters. I did end up with enough straight, flat pieces of Jacareuba to do the landing---7 boards we milled from an old beam (before frying the band saw) that I carefully biscuit joined, clamped, and sanded. I'm going to wait until it's varnished before posting a pic of that. It's gorgeous.

Every step gets at least 5 custom tetris pieces--the step itself, this end trim that has to go around the balusters, the riser, the riser trim, and the piece that goes under the bull nose

So you have to sort of imagine the long piece that's sitting on the step goes up under the tread. In these pics they are all just set in place. Right now it's all taken apart, every bit numbered, and ready for paint/stain/varnish.
Wednesday, October 10, 2012
Planet Pic

We went out for night vision hoist training currency....On the way out over Santee I was bored so took a picture through an NVG tube mounted to my helmet using my old school cell phone. The 'sun' is just glare, known as 'edgeglow'
Monday, October 8, 2012
If You Can't Stand The Heat.....
In the dash towards the finish line, the biggest remaining hurdle is the kitchen. So very tempting to just go to Ikea and buy off the shelf stuff and make it fit---but decided against it.
With ObamaGas costing $5 a gallon we combine trips down the hill---this was doctor visit/tandem bike date night/lumber run. No way I'm making my date ride in the old truck for date night, so just figured we'd make it work one way or another...

What a great time---AnnaMarie's working on painting while I'm doing other stuff for the kitchen. She's deciding stuff as we go, and really getting into it. Also it gave her lots of time to think about what color the kitchen wall would be. Very little of that wall shows but it's a dramatic difference contrasted to all the white.
 The microwave will go right where she's vacuuming, the outlet's below it there. She wants the microwave hidden from view from the livingroom.
Her favorite counter material happens to be one of the least expensive, too---formica. All the pieces we needed were in the culled lumber bin for less than half price. Where there were chips and scratches, were all parts I could cut away. I cut off the backsplashes except where it's actually against a wall and trimmed it with more of that jacareuba, with a comfortable angle where the bar stools are.

So the counter insets where your legs go for the bar. The thin drawers on the opposite side slide just under the countertop and are rounded over so no one will hurt their knees...The big open box is the firewood crib and the slot next to it is for the fireplace tools (poker, tongs, etc). The color she chose for the wall is 'fresh guacamole'. When I first built the trim for the bar, I carefully shaped the very hard jacareuba and made it big on purpose, thinking 'bar'. When AnnaMarie saw it she made THE FACE....Uh oh. So it got re-shaped to the thinnest it could be, then she liked it.


 If you look a few pictures back to the pic of AnnaMarie painting, the cabinet behind her needs 4 identical doors. So cut all the pieces, assembled them quick, and clamped them all at the same time. The bedroom was the perfect place for assembly because it's not dusty, and it doesn't matter if some glue gets on the floor.
With ObamaGas costing $5 a gallon we combine trips down the hill---this was doctor visit/tandem bike date night/lumber run. No way I'm making my date ride in the old truck for date night, so just figured we'd make it work one way or another...

What a great time---AnnaMarie's working on painting while I'm doing other stuff for the kitchen. She's deciding stuff as we go, and really getting into it. Also it gave her lots of time to think about what color the kitchen wall would be. Very little of that wall shows but it's a dramatic difference contrasted to all the white.

Her favorite counter material happens to be one of the least expensive, too---formica. All the pieces we needed were in the culled lumber bin for less than half price. Where there were chips and scratches, were all parts I could cut away. I cut off the backsplashes except where it's actually against a wall and trimmed it with more of that jacareuba, with a comfortable angle where the bar stools are.

So the counter insets where your legs go for the bar. The thin drawers on the opposite side slide just under the countertop and are rounded over so no one will hurt their knees...The big open box is the firewood crib and the slot next to it is for the fireplace tools (poker, tongs, etc). The color she chose for the wall is 'fresh guacamole'. When I first built the trim for the bar, I carefully shaped the very hard jacareuba and made it big on purpose, thinking 'bar'. When AnnaMarie saw it she made THE FACE....Uh oh. So it got re-shaped to the thinnest it could be, then she liked it.

I won't bore you with the details of building cabinet doors, but the challenge was making the slot for the interior panels but still having room for the biscuit joinery. I noticed the panels and the biscuits were the exact same thickness, so I just jammed the guide back on the joner, flipped it over, and used it as a wood shaper---basically cut the trough for the panel at the same time, and the panel acts a a giant biscuit.

Here you can see how the doors wnet together. If I was careful when cutting the trough it was completely hidden. On some doors, like this one, there's a little bit showing so it got filled with wood putty. The biscuits expand with glue and one in place are very strong

Wednesday, September 26, 2012
Jacareuba
So in the saga of the mystery lumber, here's an update.


 The Californian....She's docked at the San Diego Maritime Museum. She's the official tall ship of our state and the replica of a schooner that patrolled our coast. The figurehead for The Californian used Chritine Bach as the model---(unfortunatley without the daisy duke shorts) as she is descended from people that crewed the original schooner.
I found out the wood came from Belize and was left over from when the schooner 'The Californian' was built 30 years ago. I wrote to a guy who has a company that logs the riverbeds in Belize, and he immediately identified the wood as 'Jacareuba', also known as Santa Maria. I really wanted to build the stair treads from it. I took some of the remaining beams to a fire captain I worked with years ago---he has a brand new band saw that was big enough to cut the stuff.

This is Capt. Martino nad his bandsaw. We got through about 7 cuts before we fried the bearings that guide the blade. The cuts weren't really flat enough for stairs, and to run it through the planer you had to run it through the joiner first, which is limited to 8" wide. We ended up with enough to do the stair landing at least. I have to buy him new bearings now.

Here's most of what we produced that day, leaning against an uncut beam.
In the process of researching 'The Californian', I came across a high end model ship building company in Westminster. I wrote to them and asked if they wanted some of the cut-offs. 'The Californian' is one of their models and they boast about attention to detail, so I thought it would be cool if they could build their models of 'The Californian' out of wood from the original. The owner immediatly wrote back with a 'Hell yes' and 'How much do you want?' (I told hime I'd do it for the cost of shipping. I got the wood for free...I'd also appreciate a picture of a finished product using it)

Friday, September 14, 2012
Home Built Cabinets
There's a guy who reads this that, over a year ago, asked me how I build cabinets without a workshop. I've never posted this many pictures but I wanted to show step by step.
1) Figure out your dimensions. Cut a piece of 3/4" plywood the height of the cabinet, and double the width---plus at least 1/4". Use a router (if you're lucky enough to have a table saw with a dado blade you probably know more about building cabinets than I do) to cut a track everywhere you want a shelf, and the bottom, and the top.


Now you can cut it apart intot he left and right sides and the kerfs will match up perfectly. With a steady hand and a skilsaw you don't really have to have a table saw. Run both sides through so they are the same (that's why you added at least 1/4" , to make up for the saw blade kerf)
Whatever material you're using for the back, cut a rabbet along the back edge. I found some 3/16" luann for $6 a sheet so the rabbet is 3/16" deep.
 Drill a little pilot hole every 6" through all the grooves, then again from the other side with a countersink bit so your assembly screws can be covered with wood fill later. Now you can assemble the carcass.
 It's easiest if you clamp it together a little loose so you can tap the shelves into place. If the shelf won't have a face frame across the front of it it's a good idea to use some iron on veneer so it will take paint better than a cut plywood edge, so tap the shelf back away from the sides whatever the thinckness of the iron on stuff is---abuot 1/32".
 You probably don't need giant holes in your shelves. This cabinet holds the range hood and the holes are for the vent chase and the power cord.
Flip the carcass over and measure the height and the distance between the left and right rabbets. Cut your backing material accurate and square---this is when you square up the carcass, Nail it along one edge, then just force the carcass in line with a perpendicular edge. Mark where the shelves are and nail it there, too. If you have to cut out for plumbing or electrical, just bring that backing inside and mark and cut now, then put it on.
 Here's the one special tool you gotta get---a Kreg jig. It's a pocket drill guide with a special two stage bit, and a clamp that holds pieces of the face frame in place so you can screw them together. There are little kits that are just dowels and this little metal thing you put in the hole you drilled that marks the mating board, but they never quite line up.
 Here it is all done with the face frame nailed on. AnnaMarie really likes the re-puposed pallet look (I wouldn't use pallets---so loaded with insecticide and fungicide) so I bought cedar fence pieces and cut them to do a crate-look veneer on all the parts that show. They'll get painted a gloss white. Lining up the vents while installing the cabinet was....fun. Not.

1) Figure out your dimensions. Cut a piece of 3/4" plywood the height of the cabinet, and double the width---plus at least 1/4". Use a router (if you're lucky enough to have a table saw with a dado blade you probably know more about building cabinets than I do) to cut a track everywhere you want a shelf, and the bottom, and the top.

I just clamp my 4' level for the staight edge guide...Here's why you made the plywood piece twice the depth of your cabinet-----

Now you can cut it apart intot he left and right sides and the kerfs will match up perfectly. With a steady hand and a skilsaw you don't really have to have a table saw. Run both sides through so they are the same (that's why you added at least 1/4" , to make up for the saw blade kerf)
Whatever material you're using for the back, cut a rabbet along the back edge. I found some 3/16" luann for $6 a sheet so the rabbet is 3/16" deep.


Flip the carcass over and measure the height and the distance between the left and right rabbets. Cut your backing material accurate and square---this is when you square up the carcass, Nail it along one edge, then just force the carcass in line with a perpendicular edge. Mark where the shelves are and nail it there, too. If you have to cut out for plumbing or electrical, just bring that backing inside and mark and cut now, then put it on.


Wednesday, September 12, 2012
Light Duty

AnnaMarie couldn't find pendant lights she liked for over the bar. We had fun looking online but still couldn't find what she wanted. I was at Dixieline and they had the pendant light hardware (you buy the globe and bulbs separate) in the bargain bin for $6 each. I guess the antique bronze doesn't sell.
I have a special diamond tipped drill bit. You have to keep it wet or the glass shatters. A.M. had a pair of hand blown olive oil bottles she decided would work well. It would have been easy to just cut the bottoms off but she wanted the thick glass ring at the bottom.
Glass, power tools, water.

More glass, power tools, water. And a camera.


Friday, September 7, 2012
Getting Close
I was coming up on 180 days since the last inspection. I've got a whole bunch done in that time, but nothing completed. So I asked Rob (my building inspector) to do a progress inspection. I was at work but AnnaMarie dealt with him just fine.
Rob put together a list of everything to do before my final in November. There were only two surpises---
 He said my stair rail was too high over the nose of each tread. What he didn't account for was, I haven't added the treads yet---it will add 1" of thickness, plus the nose will come out another 1 7/8"---well into the correct height.
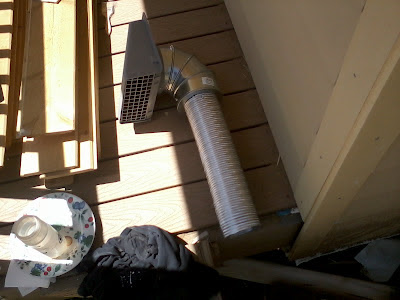
He said I can't use corrugated tobing for the range hood vent. It has to be smooth walled rigid pipe so grease won't accumulate. Getting the flexible stuff in was hard enough. The rigid stuff is going to be a real challenge.
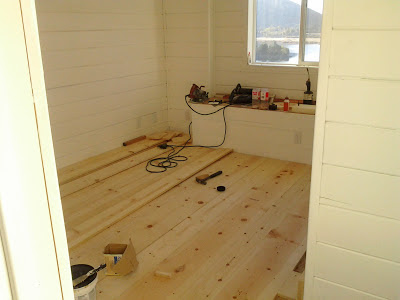
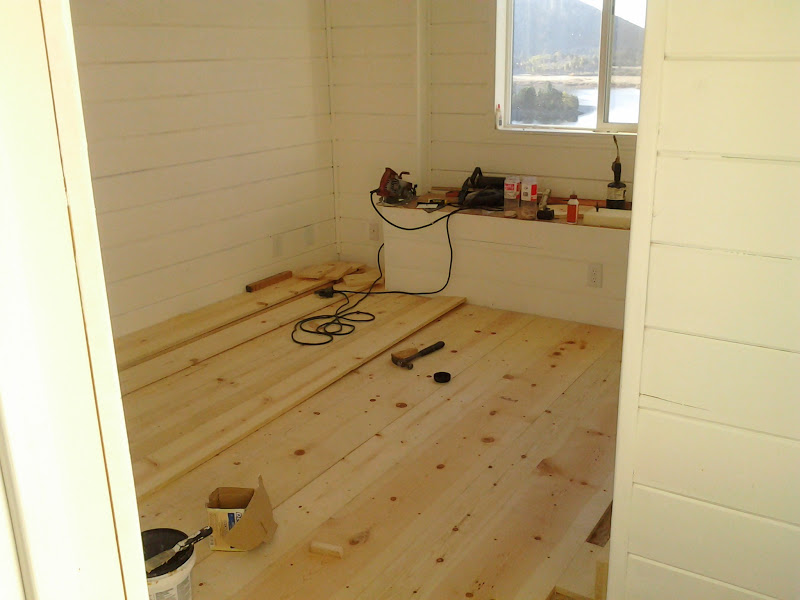
The floor is all finished----I had to let it dry for a few days, sand it, and put another coat down. A.M. wanted the upstairs planking to go perpendicular to the downstairs, and after it was in I could see why. I have to get a picture of that.
 This was early on in the finish process but gives a good idea of raw vs. finished. I absolutely love this floor and it was only $120 for all the downstairs and upstairs minus bed and bath rooms.
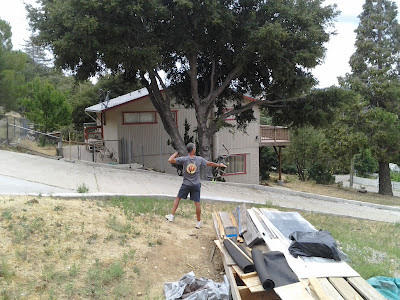
There have been a few interesting things to look at while building. Here's my neighbot Jene doing some target practice. His target is across the street way down the meadow, maybe 150 yards. He doesn't miss.

Rob put together a list of everything to do before my final in November. There were only two surpises---


He said I can't use corrugated tobing for the range hood vent. It has to be smooth walled rigid pipe so grease won't accumulate. Getting the flexible stuff in was hard enough. The rigid stuff is going to be a real challenge.
The floor is all finished----I had to let it dry for a few days, sand it, and put another coat down. A.M. wanted the upstairs planking to go perpendicular to the downstairs, and after it was in I could see why. I have to get a picture of that.

There have been a few interesting things to look at while building. Here's my neighbot Jene doing some target practice. His target is across the street way down the meadow, maybe 150 yards. He doesn't miss.

Then, there are the Chubascos. Chubascos are the clouds that form right over our mountain ridge where the cool moist ocean air slams into the hot dry desert air. This cloud dumped 5" of rain in a few hours.

Subscribe to:
Posts (Atom)