It's time we band together as Californians to save our great state. I don't care what your party line is, or what your prejudices towards these people are. They deserve amnesty and our state's future depends on it. It's simple economics.
Maybe they don't look like you. Their language might not be recognizable to you, though you probably recognize a few words....You may have even participated in rallies to keep them out. It's time we recognize these people, (Yes, they ARE people with the same dignity afforded you and me) for the hard work and sacrifice they represent. Without them our state, even our country, simply wouldn't have the prosperity it has enjoyed in the past. We all benefit from the sweat of their brow. You probably didn't know they actually DO pay taxes, and use far less in government services than you and I.
I say end all prejudices you have towards this group. Invite every last one of them into our state, and grant them tax amnesty for being here. I swear they'll spend, they'll elevate our culture. Have you tried their food?
Most importantly they will do the kind of work most Americans aren't willing to do anymore. Too long this group has been looked down upon, literally spat upon, vilified, made to feel unwelcome. There are politicians--Presidents even---that will lie and foster misconceptions about this group for political gain.
Please, open your minds and really think about what our state would be like if we didn't have them here. They really bring alot to our communities. Call them what you want---Millionaires, Billionaires, Entrepeneurs, the Well-To-Do. Just remember that it's very possible you could become one someday yourself, and ask yourself how you'd want to be treated.
Sunday, December 18, 2011
Thursday, December 15, 2011
Coming Together

Monday, December 5, 2011
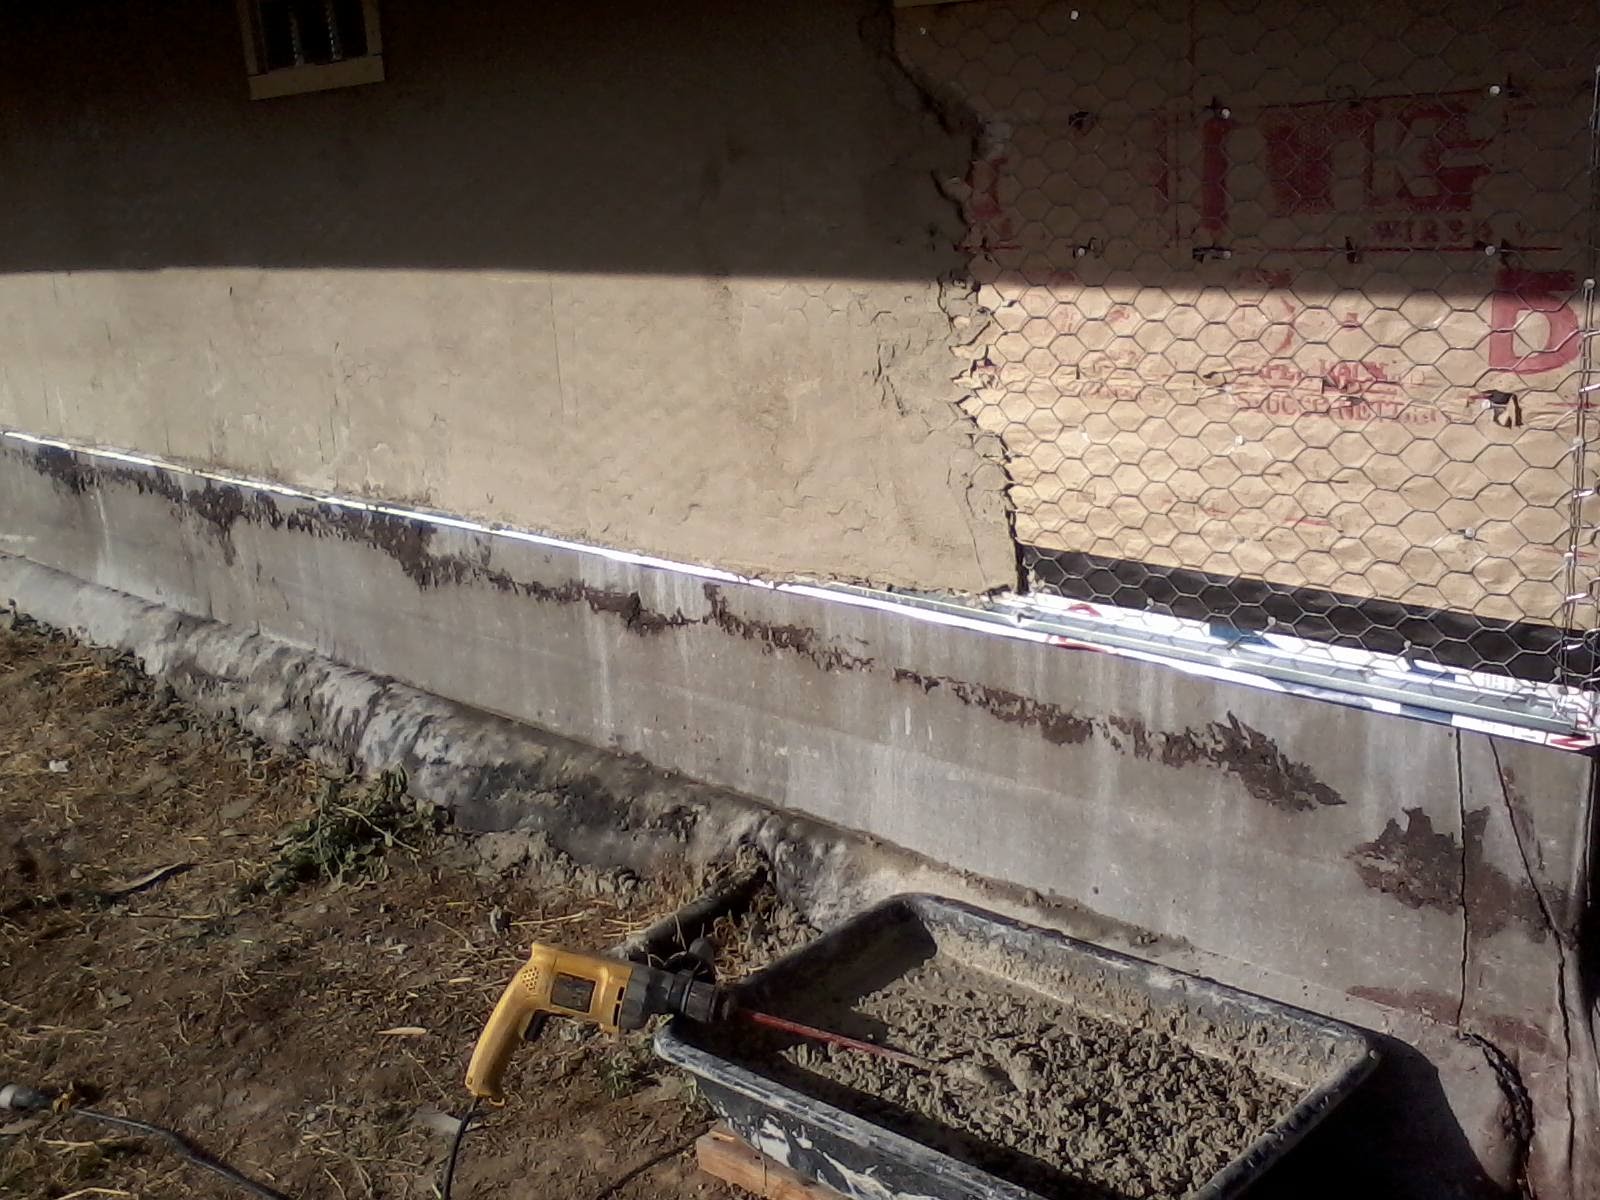
Stucco
After spending years espousing the opinion the stucco is nothing but a lazy shortcut, I decided it was the best option for what was needed. The house itself will be cement lap siding. If I had done the same siding all the way to the ground, though, it would have looked funny---the house is quite a bit taller than it is wide. So, everything from the deck level down will be masonry. This smooth stucco will get stained to look like big granite blocks.
First step is getting the K-lath up. The 100' roll unrolled itself down the hill---no pics of THAT. I shoulda, though. It was funny. You nail it up while stretching it tight as possible and cut out various openings with tin snips. You can get pretty scratched up... Then the 'weep screed' flashing goes in any edges, and corner lath on corners.
Now you mix up your stucco. I'm going with a one coat process since the finish is smooth. Most homes the stuff is actually sprayed on in a three coat process (Scratch, brown, top)
I used a tub and a mixing attachment on my 1/2" drill. Like Byron pointed out, it's just like frosting a cake. Even the mixing of the frosting.

 It's very important to work the stucco in around the wire. This first pass is a bit thin to get it in, then the next pass is after it's set up a bit. The stucco ends up about 3/4" thick.

First step is getting the K-lath up. The 100' roll unrolled itself down the hill---no pics of THAT. I shoulda, though. It was funny. You nail it up while stretching it tight as possible and cut out various openings with tin snips. You can get pretty scratched up... Then the 'weep screed' flashing goes in any edges, and corner lath on corners.
Now you mix up your stucco. I'm going with a one coat process since the finish is smooth. Most homes the stuff is actually sprayed on in a three coat process (Scratch, brown, top)
I used a tub and a mixing attachment on my 1/2" drill. Like Byron pointed out, it's just like frosting a cake. Even the mixing of the frosting.

Then you gotta apply it. I have a new respect for stucco-ers.. It is a real forearm workout. You slap some stucco on a flat board (hod, for you crossword puzzlers) scoop some up and smear it on.

Saturday, December 3, 2011
The Right Tools
I've started siding the house. I have to use the Hardiplank cement board siding due to the fire resistive codes for the area. Only other option was stucco----which I'm doing for the level underneath the porch (pics of that later)
This isn't the first time I've used the cementitious material---just the first time on my own house. I really prefer the masonite type siding. Cement board is very heavy. It can chip. Worst thing though is the dust---if you cut it with the diamond blade, this nasty silica dust gets everywhere. Mesothelioma would take some of the fun out of building.
Here's what it looks like cutting with a skilsaw---there's usually even more dust but it was windy when I took this (while sawing one handed. Here, hold my beer and watch this)

You also get staighter cuts, simply because you can see your pencil line that's normally lost in the dust cloud.
As I mentioned before, I'd only used this material on other people's houses, which meant I always had someone else to work with. You really need someone to hold one end of the board to get it into place. Northern Tools had an automatic recommendation ('Many customers also bought....') The kit wasn't expensive and got very good reviews from people that souunded credible, so I bought it. It's two parts---the first is this metal clip that wedges behind the previous board to hold one end, offset away from the wall by an inch.

It's a pretty clever design. That little metal tab holds the board. After nailing the opposite end, you depress that little hump and the board slides down, leaving room to easily get the tool out again.

More Free Building Materials
It's getting close to time to build the stair rail and guardrail around the reading nook. The early snow we had did some damage to some trees, including this mighty black oak.
 So I cut it up a bit and took chunks the correct length. I cut a few on the table saw into 2"x2" s---they look great but it's really slow. I'm gonna look into better ways to cut them. I want to make the railing out of the same stuff.

Here's a gratuitous view from the porch of Autumn at the lake.


Here's a gratuitous view from the porch of Autumn at the lake.

Thursday, October 20, 2011
The Hearth
Fun stage. Starting to do some artistic stuff that will actually show. This is the building of the hearth, done exactly how you'd do a concrete countertop. I've done the pour-in-place method before but never the upside-down mold that gives a perfectly flat surface.
Starting with the mold----this is melamine. I didn't want extreme folds in the plastic so instead of lining the entire mold with plastic I just wrapped the form walls, then screwed it all together. Then a 2x6 was cut the length of the form, and rebar wired so it would hang in the center of the concrete. 3 anchor bolts were molded into the bottom to secure the piece to the wooden base later.
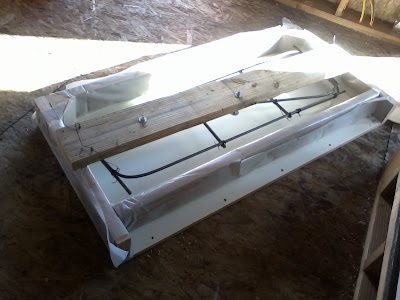 Once the rebar was checked for fit that whole part was set aside. The first sack of concrete was mixed. I took out a scoop of it and threw it in the form, then added some 'buff' color to the remainder; after thorough mixing, placed that in the form. Then three sacks of concrete were mixed with black oxide color and that got dumped in.
 Note to self---don't rely on vibrating the form to soften the edge of the different colors. You have to blend the edges manually as soon as you dump it in the form. Otherwise when your wife first sees it, she'll ask "Did you mean for it to look like that?"
After packing the concrete as best as I could, the rebar/anchor bolt rack was put in place.
 When you build the form, build it very sturdy---this one holds over 300 pounds of concrete and you have to vibrate it. If you don't do some shaking of some kind you end up with all these honeycomb voids. This form is held off the floor so I could get a crowbar under it to shake and wiggle it---then I took the blade off the sawzall and vibrated it. A few good raps with a sledge got some bubbles out, too. Make sure your form is on a level surface for curing.
 Note to self #2. If you don't want animal tracks in the pour, keep animals away. I had no idea until now the raccoons were coming inside at night. Guess it's time to buy a front door?
Let it cure at least 24 hours. Impatience is bad---some of these forms are gonna stick, and 'green' concrete might prefer to stick to part of the form and not itself. 300 pounds minus a little is one helluva paper weight.
So I carefully stripped the forms and built the wooden base. It was very tempting to just flip it over and have a look, but I would have bent the anchor bolts. The wooden base was very solid and distributed the weight evenly on the floor. I also made certain the base was over two of the floor joists.
 The wooden base was then screwed into the joists below and the Hardibacker screwed into place. The base and the fireplace surround will get a native stone veneer. The concrete still needs a little grinding, polishing and sealing.... Doing the pour indoors right near the finished spot was slightly inconvenient since I had to carry the mixed concrete in from outside, but I don't think I could have carried the finished product in without lots of help
Starting with the mold----this is melamine. I didn't want extreme folds in the plastic so instead of lining the entire mold with plastic I just wrapped the form walls, then screwed it all together. Then a 2x6 was cut the length of the form, and rebar wired so it would hang in the center of the concrete. 3 anchor bolts were molded into the bottom to secure the piece to the wooden base later.


After packing the concrete as best as I could, the rebar/anchor bolt rack was put in place.


Let it cure at least 24 hours. Impatience is bad---some of these forms are gonna stick, and 'green' concrete might prefer to stick to part of the form and not itself. 300 pounds minus a little is one helluva paper weight.
So I carefully stripped the forms and built the wooden base. It was very tempting to just flip it over and have a look, but I would have bent the anchor bolts. The wooden base was very solid and distributed the weight evenly on the floor. I also made certain the base was over two of the floor joists.

Thursday, October 13, 2011
Is This Your First Occupation?

What a rude awakening to be turned out into the real world! Suddenly no one is giving you stuff anymore! Hey, don't they realize how valuable you are?? Don't they realize what this is doing to your self esteem?
So along comes this wealth hating protest. Heck, maybe even a special interest group will pay you to go. Go teach those evil capitalists what's up.
Here's what they failed to teach you in school, though. Our economy, and all the free stuff you enjoy, rely 100% on corporation and business profit or the speculation of future profit. Those people you are protesting against are paying the vast majority of the taxes. That millionaire didn't get there by whining or holding a sign.
You sign says, "Wake Up!" Oh, we're awake. We know that the financial meltdown has far more to do with Barney Frank's 'fair housing' scheme and almost nothing to do with CEO pay. We are awake to the fact that over-regulation and undue influence of environmental laws has killed business development. We are awake to the fact that an economy can't sustain unskilled jobs artificially overcompensated not by need or scarcity but by union thuggery. Yep, you can actually earn $50,000 scanning bananas.
And those millionaires you revile? Very few were handed anything. They were the ones that got up early to study and took a job (you would have considered beneath you)after school. They found a niche, made themselves valuable and productive---and 'the system' you hate rewarded them. Well, sort of---their tax burden is hefty and few recognize their true heroics today.
Here's my question to you. Maybe you can awaken me in this regard. After you're done bringing down all the millionaires, who are you gonna tax to support all your social programs?
Friday, October 7, 2011
Patrick Asks 'The Question"
We're homeschooling Patrick this year, like we did for the girls during 6th grade. He's 11. We were just riding in the car when he asked "The Question".
I guess it's the same age I started getting curious about such things, too. They say you shouldn't overload them or go way beyond what they're able to understand, but you don't want to obfuscate or confuse, either. Incidentally, if the girls have asked such questions, they went to AnnaMarie. Quite frankly though, I know a lot more about it than she does. It's one of those things she'd just as soon not even think about. It's there, it's a necessary part of life, that's it.
So you prompt them to ask specific questions. That way they are steering the conversation to their level of understanding. "How does it all work?" "How do I get things started?" "How do you know what to put where, and when?" "Why does Mommy's look different than Daddy's?" All good questions.
Since we're homeschooling I asked the charter lead from the district. She told me about visible models that the district would even pay for. Patrick and I could do the assembly together and we could discuss everything's names and functions as we go along.
We're really enjoying the time together.

Friday, September 30, 2011
Da Roof..

Hard to tell in the picture but it's 26' to the ground.


Three reasons roofers don't lace valleys----They don't know how (I exchanged free labor for an experienced roofer that DID know how for a roofing lesson) it uses up a lot more roofing material, and it takes more time.
This steep gable comes right up against the pop-out roof, creating a snow-trapping funnel. I put down this sticky sheet rubber stuff in the valley all the way up the sidewall, then flashed the vertical surfaces with lots of flashing.
Friday, September 23, 2011
September Lightning Pre-Position

It's kind of a neat program. If the private helicopter resources are exhausted, the large campaign fires can call up National Guard helicopters to fight fires. The copters have to have a fire representative aboard trained as a Military Helicopter Equipment Manager (MHEM).
SouthOps set up a rental car for me. My relief came in, I got the car, and started driving. The helibase was in Tehachapi, only a few hours' drive, but I had to drive through and continue on another 6 hours North to Stockton to get my helicopter.
Flew South and fought fire for a few days. It was cool to see areas way off the freeways I'd driven by so many times before. They re-deployed us up to Bishop, crossing the Southern portion of the Sierras right over Lake Isabella. The fire in Bishop wasn't really much, so we then crossed over the central Sierras---the only landmark I recognized was 'Balloon Dome'. It's gorgeous country and just goes on and on. Flight following was hard---there's little radio communications in or out back there.
Days' end always involved a small army of mechanics crawling all over the helicopter checking everything over. It's big, can lift a lot, yet flies much faster than our 412 back home.

Monday, September 5, 2011
Free Building Materials!
Byron loaned me his table saw, which also sat for a year. It will cut much deeper than the skilsaw most of the house was built with. When I started making the cuts, a rich chocolate smell filled the cottage--a distinct old oak smell.
It took a few hours just to cut the rough shape and the blade wasn't quite deep enough, so a sawzall finished the cuts. The wood is so hard the circuit breaker kept popping and the wood burned as it cut.
After trudging through the plumbing and fire sprinkler steps, doing some artsy work was a welcomed change.


The other free find are some large wood bifold doors that will fit the 8' closet space. The whole 'repurposed' theme is NOT part of goal with this place, but when you find really good stuff that fits and is free, all the better
Saturday, August 27, 2011
A Day At AirOps
http://flashovertv.firerescue1.com/Media/3128-A-day-with-San-Diego-Air-Ops-San-Diego-5-The-Battalion-the-Series
This media crew from 'Flashover TV' does stories related to fire service things. They came out quite awhile ago. This is a little long but does a good job of describing our AirOps program
This media crew from 'Flashover TV' does stories related to fire service things. They came out quite awhile ago. This is a little long but does a good job of describing our AirOps program
Saturday, August 20, 2011
Mile Eighteen

With electrical done and plumbing not started, I sorta hit that wall. I'm close enough to being done that I can see everything that's left to do; looking at it all at once it's overwhelming.
Nothing for it but to keep on going.
I got the drain side of the plumbing done. The wall heater and water heater go in next---then everything that penetrates the roof will be in place. The paper and flashing is down. Time to buy the roof.
So loaded the old truck up with all the construction debris that can't be burned, donated, or recycled (mostly OSB scraps, tar paper, and various packing materials), got up really early, and went to the dump on my way to work. How cathartic! Worked the paying job for 24 hours, then straight to Ford Wholesale Roofing.
I had already chosen and paid for what I needed. That way they have it all ready in a pile ready to load. 40 year composition shingles, charcoal black. You also need various flashings, tin shingles for where roof meets gables, starter course, ridge, tar, coil nails. Pulled old truck in and the fork lift guy asked, "Are you going to take two trips or three?" Uh, we'll do it in one. I know he's thinking quarter ton truck and 3,500 pounds plus of roof....I try to explain to him how often I've loaded 5,000 pounds of concrete in the thing...Neglecting to explain that's for a short trip instead of the hour drive and one mile elevation gain we face...
So, he shrugs, lifts the entire load, drops it in the truck. The rubber stops are resting on the axle; there's no spring left.
Please, old truck, don't hit the wall. You are WAY past mile eighteen. For that matter, you're way past mile 26. I'll reward you with some really good gas.
Chug all the way home; the engine never pings once. It takes four wheel drive low to make it up the steep driveway, but make it we do. My truck's fortitude was inspiration to hand offload each 87.5 pound bundle to where they need to be--either upstairs or near the ladder.
I feel like that wall is now behind me and I'm looking forward to completing each remaining step
Sunday, August 14, 2011
Haiti, The Most Fair Nation

A good friend of mine does missionary work in Haiti. He told me something very interesting---the Haitians are really just fine not having anything and living in poverty, but if you give one of them something extra, all hell breaks loose. If someone gets the idea that somebody got something they didn't, fights will erupt, buses get overturned. Getting ahead can mean losing your head.
Since our children were very small we never did 'fair'. One kid might get an extra cookie here and there. Another kid might arbitrarily get to do something the other won't, and we've always given the answer 'we don't do fair here'.
Our kids get along great, and will share among themselves freely.
There's an old saying, 'You can't make the poor richer by making the rich poorer'. As the grocery workers prepare to go on strike yet again, their big argument isn't how hard they work or the dangers of the job or the skills required to ring up bananas; their argument is how much their CEO makes compared to them.
Well, then, go become a CEO.
At the root is a misunderstanding of how new wealth is made. CEO's have more power to increase the gross domestic product than all of congress and the executive branch combined. Punishing CEO's to try to move money towards minimally skilled labor in the name of a liveable wage is very counter-productive. You really are biting the hand that feeds you. Labor laws and the regulations that come with them, in the name of 'fairness', inhibit budding enterpeneurs from advancing and creating new wealth, industry, and jobs.
In the case of grocery workers----their last strike drove shoppers to non-union businesses like Walmart and Target. We didn't come back. If you want to pay $2 each for an avocado to support 'living wages' at a chain store, go ahead.
As Haiti can show, it IS possible for everybody to have the exact same amount, as long as that same amount is nothing. That really is fair. Just say goodbye to innovation, GDP growth, environmental protection, and the freedom towards greatness.
I will take the unfairness and advancement through merit and hard work any day. If you envy what someone else has, do you seek to take it away from them, or do what they did to achieve it?
Monday, July 25, 2011
Energized

Started doing the wiring. The main panel is out at the power pole providing the temp construction power. The panel in the house, technically, is a sub panel. A good place to begin is putting in all the boxes where outlets and fixtures will be. I picked up a copy of the National Electric Code (NEC) book to reference, so I can be code compliant. You have to be able to walk through a house and turn lights on and off to light your way. You have to have outlets placed so a floor lamp with a 6' cord can be placed along any wall. There are wiring size issues, breaker size issues, and rules where ground fault circuits have to be. Bedrooms have to have arc fault breakers. Smoke alarms and CO detectors have to be on a breaker with lights so a dead circuit won't go unnoticed.

This is the sub panel with about half of the circuits in so far. Neatness counts. You want to try to balance the two 110v legs as best as you can...The challenge with this was, WAAY back when I ran the conduit through the foundation, it just didn't end up in the middle of the stud bay so it needed a custom offset. I bought two 45 degree sweeps and kept cutting half an inch off of them equally until, put together, they centered with the panel. I like how it looks. Too bad no one will ever see it.
This is a pretty fun stage of building. There is no heavy lifting involved, you're deciding where lights and stuff will be, and you're figuring things out. The project has truly taken on a life of its own. Also it started raining and it was fun to be working 'inside' instead of having to just quit for the day.
Wednesday, July 6, 2011
There's An Inside Now

We worked together to get the housewrap up. This is a very critical stage, and doing it wrong is the source of leaks, woodrot, even termite issues later. The websites I found made it clear that a cheap product applied correctly will far outperform an expensive product slapped up there. I opted for expensive product applied correctly.
Part of the challenge is the waterproofing is applied out of order with the order you do construction. So you leave bottom edges unattached to properly slip flashing underneath when doing roofing and siding.
We used Tyvek housewrap. We taped all seams. We cut 45 degree angles over the window and door corners for supersticky flashing. We caulked, caulked, caulked.
We got a rhythm down for installing the windows and they all went well, though there are some new aches and pains after the heavy lifting and twisting. Two funny things that happened---the housewrap comes wrapped around a 9' cardboard toilet paper tube so while Byron was way up a ladder I was able to whisper in his ear from the ground....Other funny thing was inadvertently sticking my head in freshly applied caulk. Spent the day with silicone stuck in what's left of my hair, removed later with carb cleaner.
I decided we'd work from the top down with the windows, and we got all of them except one 4x4 living room window and the sliding glass door in, both of which are off the porch. Those I did by myself---not smart. I really should have got help from a neighbor instead of relying on a series of clamps and braces. No mishaps but took much, much longer and those things are HEAVY.
Monday, June 27, 2011
Finished Framing


Next is housewrap and installing windows. Windows can be a one person job, if they are very small and close to the ground. None of mine are so I'm gonna get help. When I called Byron and asked for help installing windows, he sounded pretty eager. Now I'm wondering if he thinks it's a computer issue. I should have been more clear.
Saturday, June 18, 2011
Why Nothing Got Done on the Cabin Today

Truck wouldn't start. The kids were a bit distraught----they knew the truck wouldn't last forever, and thought maybe this was goodbye. We bought it shortly after we were married and before we had any kids...Anyway, it had been sitting for awhile and all it needed was a can of carb cleaner sprayed through and it ran great.
With THAT done, and the cabin made ready for the renters (with lots of help from the kids) there was a Cuyamaca Lake issue that required some attention and a trip to town. So jumped in the Subaru--AnnaMarie and the kids just got back from a trip to Camarillo, and she told me she heard the fanbelt squeal when she had started it up...Odd, since I had just adjusted it....Well, the car started just fine, but all the warning lights were on and the power steering wasn't working. A check under the hood showed one belt VERY loose and the other belt lying in the driveway....Thank God it did it after she parked, at home, instead of somewhere on the road.
It was weird, though. All the belt pulleys seemed right, the belts looked fine, everything turned OK. Why would BOTH belts have an issue though? There's only one pulley they share, the one on the end of the crankshaft...Gave that a good yank and the pulley itself came apart. The outer ring had delaminated from the middle part. There's a rubber ring between the two, probably due to some harmonics issue or something.
The thought of having the car towed an hour away for the fix sounded expensive so got to work pulling out the radiator just to get at it. The main bolt came out without too much trouble but pulling the wheel was another matter---everything around it is plastic shrouds so there's nothing to pry against. So, pulling, wiggling, and grunting, it gave just enough to let me know it'd come off if I just kept at it.
"Yeah, we have them in stock. $189. They're notorious for delaminating like that. You'll never get the wheel off without the special tool though" Uh, I already did. "If the woodruff key is intact then it's an easy fix from here" (Nothing wrong with the key) So when I get home from work tomorrow I just have to put the new one on and button everything up and it SHOULD be good to go
Sunday, June 12, 2011
Lauren's Gettysburg Poem
OK. If you had told me I'd be posting 14 year old girl poetry on MY blog, I'da thought you were nuts....
Lauren's class was returning from a field trip and yet another very impressive teacher used the long bus ride having the kids memorize the Gettysburg Address (in honor of memorial Day). Back at school the kids were asked to produce a poem about it. Anything. Most were the 'Roses are Red' variety. This was Lauren's.
Never Forget What They Did Here
A call
An idea
“I’ll fight”
Added Enthusiasm
“For my country”
A decided expression
“For the People”
A command
A whine
“Life would be easier”
A grumble
“If slaves could do our chores”
A grimace
“For the People”
A departure
A cry
“Leave my family”
A sob
“For my country”
A kiss goodbye
“So nobly advanced”
A slamming door
A shout
“Wish I didn’t have to go”
A huff
“To school”
An ignored goodbye
“So nobly advanced”
A cold tent
A frosty breath
“I’m a brave soldier”
A determined nod
“I’ll follow through with this”
A stretch
“Fitting and proper that we should do this”
A warm comforter
A sigh
“I won’t get up”
A yawn
“There’s nothing to do”
A doze
“Fitting and proper that we should do this”
A fear
A thumping heart
“I may die”
A coordinated step
“In battle”
An acceptance
“The brave men”
A whimper
A stubborn refusal
“I won’t”
A stomp
“Eat this broccoli”
A tantrum
“The brave men”
A halt
A silence
“I hope I’m ready”
A gulp
“My country’s counting on me”
A forward march
“Great battlefield of that war”
A check
A sulk
“you’ll beat me”
A sniff
“You always win”
A surrender
“Great battlefield of that war”
A gunshot
A passing thought
“My country”
A labored breath
“Will thank me”
A throbbing pain
“Shall not perish from this earth”
A foul ball
A wince
“My team would be better”
A hung head
“Without me on it”
A resignation
“Shall not perish from the earth”
A deadly field
A survivor
“How brave they were”
An admiration
“To die”
A tear
“Shall not die in vain”
A computer game
A champion
“I won”
A prideful smile
“And you lost”
A sneer
“Shall not have died in vain”
An address
A live listener
“How true”
A hope
“We must carry it out”
An agreement
“Never forget what they did here”
A history book page
A student
“How true”
A hope
“We must carry it out”
An agreement
“Never forget what they did here”
A command
An obeyed
“For the People”
A slamming door
An apology
“So nobly advanced”
A warm comforter
An awakening
“Fitting and proper that we should do this”
A whimper
A courageous bite
“The brave men”
A check
A defensive move
“Great battlefield of that war”
A foul ball
A second try
“Shall not perish from the earth”
A computer game
A modest winner
“Shall not have died in vain”
Tuesday, June 7, 2011
Getting Ready for Rough Framing Inspection


There are two solutions---option One is frame in and eliminate part if the window on the left so it's visually centered----but losing the best of the view from inside. Option B is a stone veneer on the outside, to the right of the window opening, continued on the porch wall, all the way down to the foundation. Added benefit is, water coming off the roof from the gable would run down stone instead of siding.
Before the inspection I have to install the fire sprinklers, all the windows, and doors. I could put the roof on too. Right now I'm working 10 days straight (the two other HRM's took vacations) but I'll get time off with good weather soon so work will continue. The wood pile is down to almost nothing. AnnaMarie likes the idea of having her whole driveway back again.
Friday, June 3, 2011
Boat Launch 2011
After a one year hiatus, Mr. Copeland's 7th and 8th grade class built and launched a boat, this time an outrigger. It's a great way to end the school year, with a big beach party.
 One of the crew chiefs at work has a son that reps for a stand-up paddle board company. He and his friend brought some boards out and gave lessons---it was a hit and good addition to the event.
 Not exactly sure why McKenna was so anxious for a stand up paddle lesson. She never expressed an interest in it before...
So after Riley and Eric put in a few hours with the kids, they took the outrigger out for a paddle. They really got the thing moving.


So after Riley and Eric put in a few hours with the kids, they took the outrigger out for a paddle. They really got the thing moving.

Then, of course, the obligatory group photo

Wednesday, May 25, 2011
Saturday, May 21, 2011
Roof Sheeting
There are quite a few steps in this project that are basically question marks. If I'm really not sure how to get over some hurdle, I try to get everything done up to the point of the roadblock and reduce it to a single question.
How do you cut an irregular triangle the right size for a gable that's 28' off the ground?
 The other issue is this radiant barrier stuff. It's like extra thick bubblewrap with mylar on both sides. It reflects 96% of the radiant heat and helps make it a very efficient 'green' building.


The underside, looking up. You can tell how high the ceiling's gonna be by the ceiling joists. If you ever work around that radiant barrier stuff wear sunglasses
How do you cut an irregular triangle the right size for a gable that's 28' off the ground?

So I climbed up with a piece of this radiant barrier, tacked it in place, and trimmed it to shape. Took it back down and used it as a template for cutting the sheeting.

Just getting the lumber up there was hard. YOu sort of cradle it in your arms while shimmying up the ladder. With the wind you have to be careful and be willing to drop a carefully cut piece if need be.
The only part left is the curved rafters for the kick-out over the bedroom and that will be pretty easy compared to the gable.

The underside, looking up. You can tell how high the ceiling's gonna be by the ceiling joists. If you ever work around that radiant barrier stuff wear sunglasses

Sunday, May 8, 2011
Interior Framing
 Had a particularly productive day yesterday. The paying job will demand most of my attention for awhile so I really wanted to get as much done as I could. Started at sunrise then started cleanup at sunset...
Got the bathroom rough-framed in. Lesson learned from before---buy the tub early and frame around it.

Started to get the ceiling joists in---I really struggled with how high to make the ceiling. Lower is warmer and cozier--it also makes the overall structure stronger . Higher makes it feel bigger. After consulting a trusted source, decided on 107" from the floor. With the joists in I can picture the room now. It's a smallish bedroom so too high would have felt like a hallway. I'm happy with it.
 The roof is all framed up now. Getting the outside fascia in place was hard because they are heavy, require weird cuts, and are way off the ground. It took a full day just to install ONE of them. By contrast, all the upstairs interior framing, installing the bathtub, and getting some of the ceiling joists in took the same amount of time. When there's no real risk of falling you can work a lot faster.
 Framing is by far the most fun and most rewarding stage of building. Too bad it goes by so darned fast. I was sort of in an Irish music mood too---maybe because everything's so lush right now thanks to the rains. Framing, and Irish music. Slice of heaven.
Subscribe to:
Posts (Atom)