So many days are spent getting work done, either here or at the fire department. So much of getting work done requires putting distance between myself and my home planet. There are a number of ways to accomplish this; however, the return trip is always top on the mind----taking off is optional. Landing is not. When you do return, you want to return to the correct place at a comfortable speed.
It was time to get the tall wall done. I promised Mom I wouldn't attempt it alone. Once again, Byron to the rescue---he came down and helped set up the scaffolding I borrowed, even brought some missing pieces that were needed. It made the work safer and more productive and we made it up almost to the very top. I'll finish soon if the weather holds, then final painting on the way down while taking the scaffolding back apart. We started cutting siding boards into wavy lined shingles for up in the gable. It came out really well. Most of the caulking is completed too. I had to take A.M. to an appointment and returned to find Byron had cleaned everything up inside. This, by the way, is what I consider the ugly side of the house but the only person that will see it is Keith, who owns the dome home next door. Oh and soffits---the eaves have to be filled in with this concrete soffit board stuff. I really don't like how it looks but it's required in fire resistive construction. It went in easier than I had anticipated and really doesn't look all that bad
Thursday, January 5, 2012
Sunday, December 18, 2011
Amnesty in California
It's time we band together as Californians to save our great state. I don't care what your party line is, or what your prejudices towards these people are. They deserve amnesty and our state's future depends on it. It's simple economics.
Maybe they don't look like you. Their language might not be recognizable to you, though you probably recognize a few words....You may have even participated in rallies to keep them out. It's time we recognize these people, (Yes, they ARE people with the same dignity afforded you and me) for the hard work and sacrifice they represent. Without them our state, even our country, simply wouldn't have the prosperity it has enjoyed in the past. We all benefit from the sweat of their brow. You probably didn't know they actually DO pay taxes, and use far less in government services than you and I.
I say end all prejudices you have towards this group. Invite every last one of them into our state, and grant them tax amnesty for being here. I swear they'll spend, they'll elevate our culture. Have you tried their food?
Most importantly they will do the kind of work most Americans aren't willing to do anymore. Too long this group has been looked down upon, literally spat upon, vilified, made to feel unwelcome. There are politicians--Presidents even---that will lie and foster misconceptions about this group for political gain.
Please, open your minds and really think about what our state would be like if we didn't have them here. They really bring alot to our communities. Call them what you want---Millionaires, Billionaires, Entrepeneurs, the Well-To-Do. Just remember that it's very possible you could become one someday yourself, and ask yourself how you'd want to be treated.
Maybe they don't look like you. Their language might not be recognizable to you, though you probably recognize a few words....You may have even participated in rallies to keep them out. It's time we recognize these people, (Yes, they ARE people with the same dignity afforded you and me) for the hard work and sacrifice they represent. Without them our state, even our country, simply wouldn't have the prosperity it has enjoyed in the past. We all benefit from the sweat of their brow. You probably didn't know they actually DO pay taxes, and use far less in government services than you and I.
I say end all prejudices you have towards this group. Invite every last one of them into our state, and grant them tax amnesty for being here. I swear they'll spend, they'll elevate our culture. Have you tried their food?
Most importantly they will do the kind of work most Americans aren't willing to do anymore. Too long this group has been looked down upon, literally spat upon, vilified, made to feel unwelcome. There are politicians--Presidents even---that will lie and foster misconceptions about this group for political gain.
Please, open your minds and really think about what our state would be like if we didn't have them here. They really bring alot to our communities. Call them what you want---Millionaires, Billionaires, Entrepeneurs, the Well-To-Do. Just remember that it's very possible you could become one someday yourself, and ask yourself how you'd want to be treated.
Thursday, December 15, 2011
Coming Together
I realized I hadn't posted an update of the exterior for awhile. You can see the stucco below the deck level. The siding is going up nicely---now for the tall wall. I borrowed some scaffolding for that part.
Monday, December 5, 2011
Stucco
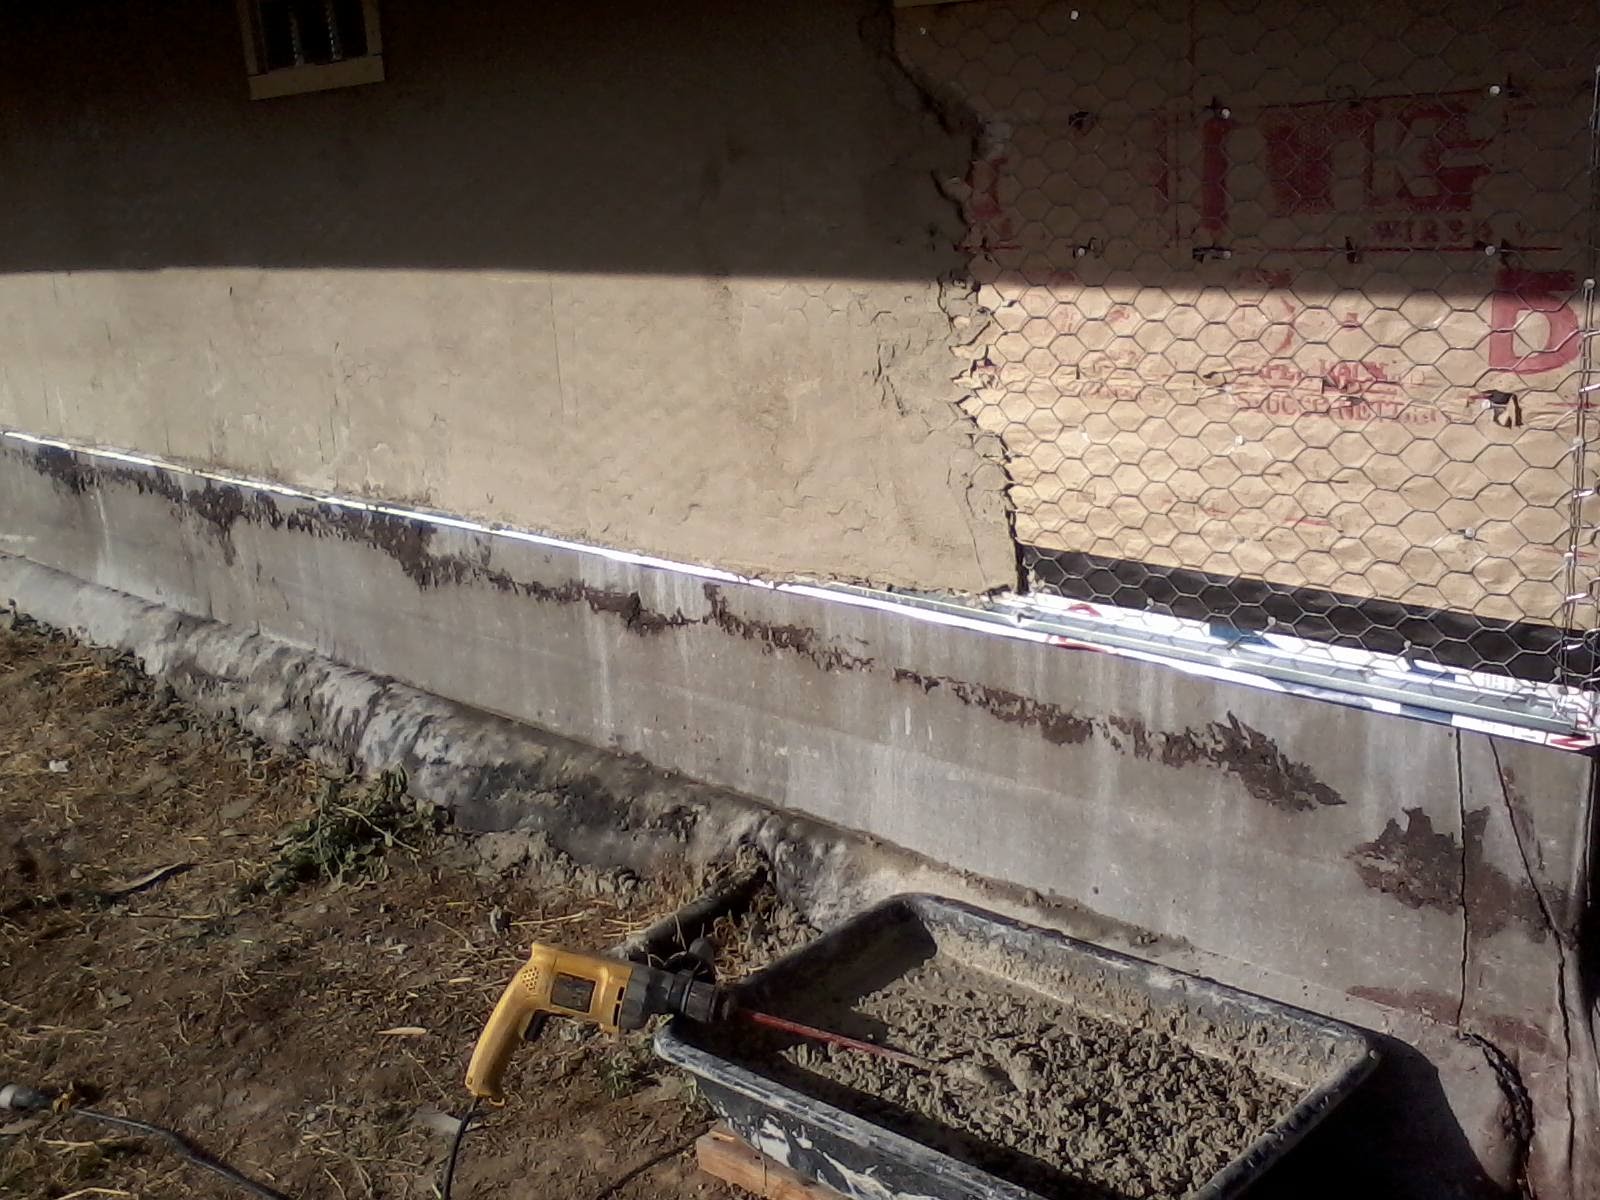
After spending years espousing the opinion the stucco is nothing but a lazy shortcut, I decided it was the best option for what was needed. The house itself will be cement lap siding. If I had done the same siding all the way to the ground, though, it would have looked funny---the house is quite a bit taller than it is wide. So, everything from the deck level down will be masonry. This smooth stucco will get stained to look like big granite blocks.
First step is getting the K-lath up. The 100' roll unrolled itself down the hill---no pics of THAT. I shoulda, though. It was funny. You nail it up while stretching it tight as possible and cut out various openings with tin snips. You can get pretty scratched up... Then the 'weep screed' flashing goes in any edges, and corner lath on corners.
Now you mix up your stucco. I'm going with a one coat process since the finish is smooth. Most homes the stuff is actually sprayed on in a three coat process (Scratch, brown, top)
I used a tub and a mixing attachment on my 1/2" drill. Like Byron pointed out, it's just like frosting a cake. Even the mixing of the frosting.
First step is getting the K-lath up. The 100' roll unrolled itself down the hill---no pics of THAT. I shoulda, though. It was funny. You nail it up while stretching it tight as possible and cut out various openings with tin snips. You can get pretty scratched up... Then the 'weep screed' flashing goes in any edges, and corner lath on corners.
Now you mix up your stucco. I'm going with a one coat process since the finish is smooth. Most homes the stuff is actually sprayed on in a three coat process (Scratch, brown, top)
I used a tub and a mixing attachment on my 1/2" drill. Like Byron pointed out, it's just like frosting a cake. Even the mixing of the frosting.
Then you gotta apply it. I have a new respect for stucco-ers.. It is a real forearm workout. You slap some stucco on a flat board (hod, for you crossword puzzlers) scoop some up and smear it on.
It's very important to work the stucco in around the wire. This first pass is a bit thin to get it in, then the next pass is after it's set up a bit. The stucco ends up about 3/4" thick. Saturday, December 3, 2011
The Right Tools
I've started siding the house. I have to use the Hardiplank cement board siding due to the fire resistive codes for the area. Only other option was stucco----which I'm doing for the level underneath the porch (pics of that later)
This isn't the first time I've used the cementitious material---just the first time on my own house. I really prefer the masonite type siding. Cement board is very heavy. It can chip. Worst thing though is the dust---if you cut it with the diamond blade, this nasty silica dust gets everywhere. Mesothelioma would take some of the fun out of building.
Here's what it looks like cutting with a skilsaw---there's usually even more dust but it was windy when I took this (while sawing one handed. Here, hold my beer and watch this)Northern Tools (an online supply company) had these shears made specifically for cutting this material. It makes zero dust, just this somewhat annoying curly kerf material. It cuts fast, and can cut some larger radius curves, too.
You also get staighter cuts, simply because you can see your pencil line that's normally lost in the dust cloud.
As I mentioned before, I'd only used this material on other people's houses, which meant I always had someone else to work with. You really need someone to hold one end of the board to get it into place. Northern Tools had an automatic recommendation ('Many customers also bought....') The kit wasn't expensive and got very good reviews from people that souunded credible, so I bought it. It's two parts---the first is this metal clip that wedges behind the previous board to hold one end, offset away from the wall by an inch.
It's a pretty clever design. That little metal tab holds the board. After nailing the opposite end, you depress that little hump and the board slides down, leaving room to easily get the tool out again.
Here's the other part of the kit. The back side has this slide-in part you set for the desired exposure of the lap siding. I picked 7" showing, which makes for a good 1 1/4" overlap, so I can blind nail the board a good distance from the edge and still cover the nail with the next board. The trim boards around the windows, doors, and corners are too thick for the shears to cut so I have to use the skilsaw for that still. More Free Building Materials
It's getting close to time to build the stair rail and guardrail around the reading nook. The early snow we had did some damage to some trees, including this mighty black oak.
So I cut it up a bit and took chunks the correct length. I cut a few on the table saw into 2"x2" s---they look great but it's really slow. I'm gonna look into better ways to cut them. I want to make the railing out of the same stuff.
Here's a gratuitous view from the porch of Autumn at the lake.
So I cut it up a bit and took chunks the correct length. I cut a few on the table saw into 2"x2" s---they look great but it's really slow. I'm gonna look into better ways to cut them. I want to make the railing out of the same stuff.
Here's a gratuitous view from the porch of Autumn at the lake.
Thursday, October 20, 2011
The Hearth
Fun stage. Starting to do some artistic stuff that will actually show. This is the building of the hearth, done exactly how you'd do a concrete countertop. I've done the pour-in-place method before but never the upside-down mold that gives a perfectly flat surface.
Starting with the mold----this is melamine. I didn't want extreme folds in the plastic so instead of lining the entire mold with plastic I just wrapped the form walls, then screwed it all together. Then a 2x6 was cut the length of the form, and rebar wired so it would hang in the center of the concrete. 3 anchor bolts were molded into the bottom to secure the piece to the wooden base later.
Once the rebar was checked for fit that whole part was set aside. The first sack of concrete was mixed. I took out a scoop of it and threw it in the form, then added some 'buff' color to the remainder; after thorough mixing, placed that in the form. Then three sacks of concrete were mixed with black oxide color and that got dumped in.
Note to self---don't rely on vibrating the form to soften the edge of the different colors. You have to blend the edges manually as soon as you dump it in the form. Otherwise when your wife first sees it, she'll ask "Did you mean for it to look like that?"
After packing the concrete as best as I could, the rebar/anchor bolt rack was put in place.
When you build the form, build it very sturdy---this one holds over 300 pounds of concrete and you have to vibrate it. If you don't do some shaking of some kind you end up with all these honeycomb voids. This form is held off the floor so I could get a crowbar under it to shake and wiggle it---then I took the blade off the sawzall and vibrated it. A few good raps with a sledge got some bubbles out, too. Make sure your form is on a level surface for curing.
Note to self #2. If you don't want animal tracks in the pour, keep animals away. I had no idea until now the raccoons were coming inside at night. Guess it's time to buy a front door?
Let it cure at least 24 hours. Impatience is bad---some of these forms are gonna stick, and 'green' concrete might prefer to stick to part of the form and not itself. 300 pounds minus a little is one helluva paper weight.
So I carefully stripped the forms and built the wooden base. It was very tempting to just flip it over and have a look, but I would have bent the anchor bolts. The wooden base was very solid and distributed the weight evenly on the floor. I also made certain the base was over two of the floor joists.
The wooden base was then screwed into the joists below and the Hardibacker screwed into place. The base and the fireplace surround will get a native stone veneer. The concrete still needs a little grinding, polishing and sealing.... Doing the pour indoors right near the finished spot was slightly inconvenient since I had to carry the mixed concrete in from outside, but I don't think I could have carried the finished product in without lots of help
Starting with the mold----this is melamine. I didn't want extreme folds in the plastic so instead of lining the entire mold with plastic I just wrapped the form walls, then screwed it all together. Then a 2x6 was cut the length of the form, and rebar wired so it would hang in the center of the concrete. 3 anchor bolts were molded into the bottom to secure the piece to the wooden base later.
Once the rebar was checked for fit that whole part was set aside. The first sack of concrete was mixed. I took out a scoop of it and threw it in the form, then added some 'buff' color to the remainder; after thorough mixing, placed that in the form. Then three sacks of concrete were mixed with black oxide color and that got dumped in.
Note to self---don't rely on vibrating the form to soften the edge of the different colors. You have to blend the edges manually as soon as you dump it in the form. Otherwise when your wife first sees it, she'll ask "Did you mean for it to look like that?"
After packing the concrete as best as I could, the rebar/anchor bolt rack was put in place.
When you build the form, build it very sturdy---this one holds over 300 pounds of concrete and you have to vibrate it. If you don't do some shaking of some kind you end up with all these honeycomb voids. This form is held off the floor so I could get a crowbar under it to shake and wiggle it---then I took the blade off the sawzall and vibrated it. A few good raps with a sledge got some bubbles out, too. Make sure your form is on a level surface for curing.
Note to self #2. If you don't want animal tracks in the pour, keep animals away. I had no idea until now the raccoons were coming inside at night. Guess it's time to buy a front door?
Let it cure at least 24 hours. Impatience is bad---some of these forms are gonna stick, and 'green' concrete might prefer to stick to part of the form and not itself. 300 pounds minus a little is one helluva paper weight.
So I carefully stripped the forms and built the wooden base. It was very tempting to just flip it over and have a look, but I would have bent the anchor bolts. The wooden base was very solid and distributed the weight evenly on the floor. I also made certain the base was over two of the floor joists.
The wooden base was then screwed into the joists below and the Hardibacker screwed into place. The base and the fireplace surround will get a native stone veneer. The concrete still needs a little grinding, polishing and sealing.... Doing the pour indoors right near the finished spot was slightly inconvenient since I had to carry the mixed concrete in from outside, but I don't think I could have carried the finished product in without lots of help
Thursday, October 13, 2011
Is This Your First Occupation?
Look--I know it was a rude awakening. After 16 years or so of government schools where there was lots of emphasis on fairness and self esteem, and little on productivity and entrepreneurship... Too few teachers understood and taught what runs our economy and too many filled your head with the liberal tripe their union clings to. You saw first hand how your government will take care of you---free food before, during, and after school, free counseling, contraception, field trips, transportation. You must have gotten the impression the government has unlimited funds. You must have gotten the notion that if someone has more than you, it's because they took it away from you. After all, we're all the same, right?
What a rude awakening to be turned out into the real world! Suddenly no one is giving you stuff anymore! Hey, don't they realize how valuable you are?? Don't they realize what this is doing to your self esteem?
So along comes this wealth hating protest. Heck, maybe even a special interest group will pay you to go. Go teach those evil capitalists what's up.
Here's what they failed to teach you in school, though. Our economy, and all the free stuff you enjoy, rely 100% on corporation and business profit or the speculation of future profit. Those people you are protesting against are paying the vast majority of the taxes. That millionaire didn't get there by whining or holding a sign.
You sign says, "Wake Up!" Oh, we're awake. We know that the financial meltdown has far more to do with Barney Frank's 'fair housing' scheme and almost nothing to do with CEO pay. We are awake to the fact that over-regulation and undue influence of environmental laws has killed business development. We are awake to the fact that an economy can't sustain unskilled jobs artificially overcompensated not by need or scarcity but by union thuggery. Yep, you can actually earn $50,000 scanning bananas.
And those millionaires you revile? Very few were handed anything. They were the ones that got up early to study and took a job (you would have considered beneath you)after school. They found a niche, made themselves valuable and productive---and 'the system' you hate rewarded them. Well, sort of---their tax burden is hefty and few recognize their true heroics today.
Here's my question to you. Maybe you can awaken me in this regard. After you're done bringing down all the millionaires, who are you gonna tax to support all your social programs?
What a rude awakening to be turned out into the real world! Suddenly no one is giving you stuff anymore! Hey, don't they realize how valuable you are?? Don't they realize what this is doing to your self esteem?
So along comes this wealth hating protest. Heck, maybe even a special interest group will pay you to go. Go teach those evil capitalists what's up.
Here's what they failed to teach you in school, though. Our economy, and all the free stuff you enjoy, rely 100% on corporation and business profit or the speculation of future profit. Those people you are protesting against are paying the vast majority of the taxes. That millionaire didn't get there by whining or holding a sign.
You sign says, "Wake Up!" Oh, we're awake. We know that the financial meltdown has far more to do with Barney Frank's 'fair housing' scheme and almost nothing to do with CEO pay. We are awake to the fact that over-regulation and undue influence of environmental laws has killed business development. We are awake to the fact that an economy can't sustain unskilled jobs artificially overcompensated not by need or scarcity but by union thuggery. Yep, you can actually earn $50,000 scanning bananas.
And those millionaires you revile? Very few were handed anything. They were the ones that got up early to study and took a job (you would have considered beneath you)after school. They found a niche, made themselves valuable and productive---and 'the system' you hate rewarded them. Well, sort of---their tax burden is hefty and few recognize their true heroics today.
Here's my question to you. Maybe you can awaken me in this regard. After you're done bringing down all the millionaires, who are you gonna tax to support all your social programs?
Friday, October 7, 2011
Patrick Asks 'The Question"
We're homeschooling Patrick this year, like we did for the girls during 6th grade. He's 11. We were just riding in the car when he asked "The Question".
I guess it's the same age I started getting curious about such things, too. They say you shouldn't overload them or go way beyond what they're able to understand, but you don't want to obfuscate or confuse, either. Incidentally, if the girls have asked such questions, they went to AnnaMarie. Quite frankly though, I know a lot more about it than she does. It's one of those things she'd just as soon not even think about. It's there, it's a necessary part of life, that's it.
So you prompt them to ask specific questions. That way they are steering the conversation to their level of understanding. "How does it all work?" "How do I get things started?" "How do you know what to put where, and when?" "Why does Mommy's look different than Daddy's?" All good questions.
Since we're homeschooling I asked the charter lead from the district. She told me about visible models that the district would even pay for. Patrick and I could do the assembly together and we could discuss everything's names and functions as we go along.
We're really enjoying the time together.
I guess it's the same age I started getting curious about such things, too. They say you shouldn't overload them or go way beyond what they're able to understand, but you don't want to obfuscate or confuse, either. Incidentally, if the girls have asked such questions, they went to AnnaMarie. Quite frankly though, I know a lot more about it than she does. It's one of those things she'd just as soon not even think about. It's there, it's a necessary part of life, that's it.
So you prompt them to ask specific questions. That way they are steering the conversation to their level of understanding. "How does it all work?" "How do I get things started?" "How do you know what to put where, and when?" "Why does Mommy's look different than Daddy's?" All good questions.
Since we're homeschooling I asked the charter lead from the district. She told me about visible models that the district would even pay for. Patrick and I could do the assembly together and we could discuss everything's names and functions as we go along.
We're really enjoying the time together.
Friday, September 30, 2011
Da Roof..
Shelter really isn't shelter until there's a roof. Roofing is one of the more rewarding parts of the building project---everything underneath is now protected from the elements, and you can get work done regardless of the weather. First you have to get the materials up there, though. I built a temporary stand-off since the roofing goes 3/8" past the drip edge, and put some stops so the ladder can't slide off. Then it's a matter of shoulder loading the bundles of shingles----3/4's of them weigh 68 pounds, and every fourth weighs 76 pounds. (one in four bundles has more shingles so it will work out to 4 bundles per square, a square being 100 square feet covered)
Hard to tell in the picture but it's 26' to the ground.
I made a work platform out of scrap to hold stuff. You need a flat surface to cut the shingles on. There's a specific pattern to cut each starter shingle, working left to right from the roof's edge---that way the seams don't overlap. Every 5 courses I snapped a chalkline to keep everything straight (or else when you get to the top everything looks un-even)
The valleys......This roof has every challenge there is---steep valleys, gable junctions, roof to wall junctions, even curved rooflines. I'm of the opinion there is only one correct way to roof valleys when using composition roofing, and that is to lace them. The cheap shortcut is to put metal flashing down and simply cut the shingles at the bottom of the valley. The metal tends to cook the shingles causing premature failure. The shingles are cut right where the water flows. Leaves and pine needles accumulate and get under. Other than chimneys, valleys are the most likely origin of leaks.
Three reasons roofers don't lace valleys----They don't know how (I exchanged free labor for an experienced roofer that DID know how for a roofing lesson) it uses up a lot more roofing material, and it takes more time.
This steep gable comes right up against the pop-out roof, creating a snow-trapping funnel. I put down this sticky sheet rubber stuff in the valley all the way up the sidewall, then flashed the vertical surfaces with lots of flashing.
Hard to tell in the picture but it's 26' to the ground.
I made a work platform out of scrap to hold stuff. You need a flat surface to cut the shingles on. There's a specific pattern to cut each starter shingle, working left to right from the roof's edge---that way the seams don't overlap. Every 5 courses I snapped a chalkline to keep everything straight (or else when you get to the top everything looks un-even)
The valleys......This roof has every challenge there is---steep valleys, gable junctions, roof to wall junctions, even curved rooflines. I'm of the opinion there is only one correct way to roof valleys when using composition roofing, and that is to lace them. The cheap shortcut is to put metal flashing down and simply cut the shingles at the bottom of the valley. The metal tends to cook the shingles causing premature failure. The shingles are cut right where the water flows. Leaves and pine needles accumulate and get under. Other than chimneys, valleys are the most likely origin of leaks.
Three reasons roofers don't lace valleys----They don't know how (I exchanged free labor for an experienced roofer that DID know how for a roofing lesson) it uses up a lot more roofing material, and it takes more time.
This steep gable comes right up against the pop-out roof, creating a snow-trapping funnel. I put down this sticky sheet rubber stuff in the valley all the way up the sidewall, then flashed the vertical surfaces with lots of flashing.
Friday, September 23, 2011
September Lightning Pre-Position
It was a bit ironic, just because I was working a 48 hour shift over the 9/11 weekend and concurrently on the bubble and rostered as a Technical Information Specialist (TIS) for the Urban Search And Rescue task force (just in case there was an attack)... Midway through the shift sometime after midnight got the call to report for something completely different, managing a military aircraft for fires up North.
It's kind of a neat program. If the private helicopter resources are exhausted, the large campaign fires can call up National Guard helicopters to fight fires. The copters have to have a fire representative aboard trained as a Military Helicopter Equipment Manager (MHEM).
SouthOps set up a rental car for me. My relief came in, I got the car, and started driving. The helibase was in Tehachapi, only a few hours' drive, but I had to drive through and continue on another 6 hours North to Stockton to get my helicopter.
Flew South and fought fire for a few days. It was cool to see areas way off the freeways I'd driven by so many times before. They re-deployed us up to Bishop, crossing the Southern portion of the Sierras right over Lake Isabella. The fire in Bishop wasn't really much, so we then crossed over the central Sierras---the only landmark I recognized was 'Balloon Dome'. It's gorgeous country and just goes on and on. Flight following was hard---there's little radio communications in or out back there.
Days' end always involved a small army of mechanics crawling all over the helicopter checking everything over. It's big, can lift a lot, yet flies much faster than our 412 back home.
It's kind of a neat program. If the private helicopter resources are exhausted, the large campaign fires can call up National Guard helicopters to fight fires. The copters have to have a fire representative aboard trained as a Military Helicopter Equipment Manager (MHEM).
SouthOps set up a rental car for me. My relief came in, I got the car, and started driving. The helibase was in Tehachapi, only a few hours' drive, but I had to drive through and continue on another 6 hours North to Stockton to get my helicopter.
Flew South and fought fire for a few days. It was cool to see areas way off the freeways I'd driven by so many times before. They re-deployed us up to Bishop, crossing the Southern portion of the Sierras right over Lake Isabella. The fire in Bishop wasn't really much, so we then crossed over the central Sierras---the only landmark I recognized was 'Balloon Dome'. It's gorgeous country and just goes on and on. Flight following was hard---there's little radio communications in or out back there.
Days' end always involved a small army of mechanics crawling all over the helicopter checking everything over. It's big, can lift a lot, yet flies much faster than our 412 back home.
Subscribe to:
Posts (Atom)