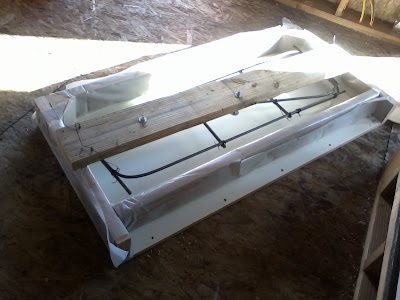
Fun stage. Starting to do some artistic stuff that will actually show. This is the building of the hearth, done exactly how you'd do a concrete countertop. I've done the pour-in-place method before but never the upside-down mold that gives a perfectly flat surface.
Starting with the mold----this is melamine. I didn't want extreme folds in the plastic so instead of lining the entire mold with plastic I just wrapped the form walls, then screwed it all together. Then a 2x6 was cut the length of the form, and rebar wired so it would hang in the center of the concrete. 3 anchor bolts were molded into the bottom to secure the piece to the wooden base later.
Once the rebar was checked for fit that whole part was set aside. The first sack of concrete was mixed. I took out a scoop of it and threw it in the form, then added some 'buff' color to the remainder; after thorough mixing, placed that in the form. Then three sacks of concrete were mixed with black oxide color and that got dumped in.
Note to self---don't rely on vibrating the form to soften the edge of the different colors. You have to blend the edges manually as soon as you dump it in the form. Otherwise when your wife first sees it, she'll ask "Did you mean for it to look like that?"
After packing the concrete as best as I could, the rebar/anchor bolt rack was put in place.
When you build the form, build it very sturdy---this one holds over 300 pounds of concrete and you have to vibrate it. If you don't do some shaking of some kind you end up with all these honeycomb voids. This form is held off the floor so I could get a crowbar under it to shake and wiggle it---then I took the blade off the sawzall and vibrated it. A few good raps with a sledge got some bubbles out, too. Make sure your form is on a level surface for curing.
Note to self #2. If you don't want animal tracks in the pour, keep animals away. I had no idea until now the raccoons were coming inside at night. Guess it's time to buy a front door?
Let it cure at least 24 hours. Impatience is bad---some of these forms are gonna stick, and 'green' concrete might prefer to stick to part of the form and not itself. 300 pounds minus a little is one helluva paper weight.
So I carefully stripped the forms and built the wooden base. It was very tempting to just flip it over and have a look, but I would have bent the anchor bolts. The wooden base was very solid and distributed the weight evenly on the floor. I also made certain the base was over two of the floor joists.
The wooden base was then screwed into the joists below and the Hardibacker screwed into place. The base and the fireplace surround will get a native stone veneer. The concrete still needs a little grinding, polishing and sealing.... Doing the pour indoors right near the finished spot was slightly inconvenient since I had to carry the mixed concrete in from outside, but I don't think I could have carried the finished product in without lots of help
Subscribe to:
Post Comments (Atom)


No comments:
Post a Comment