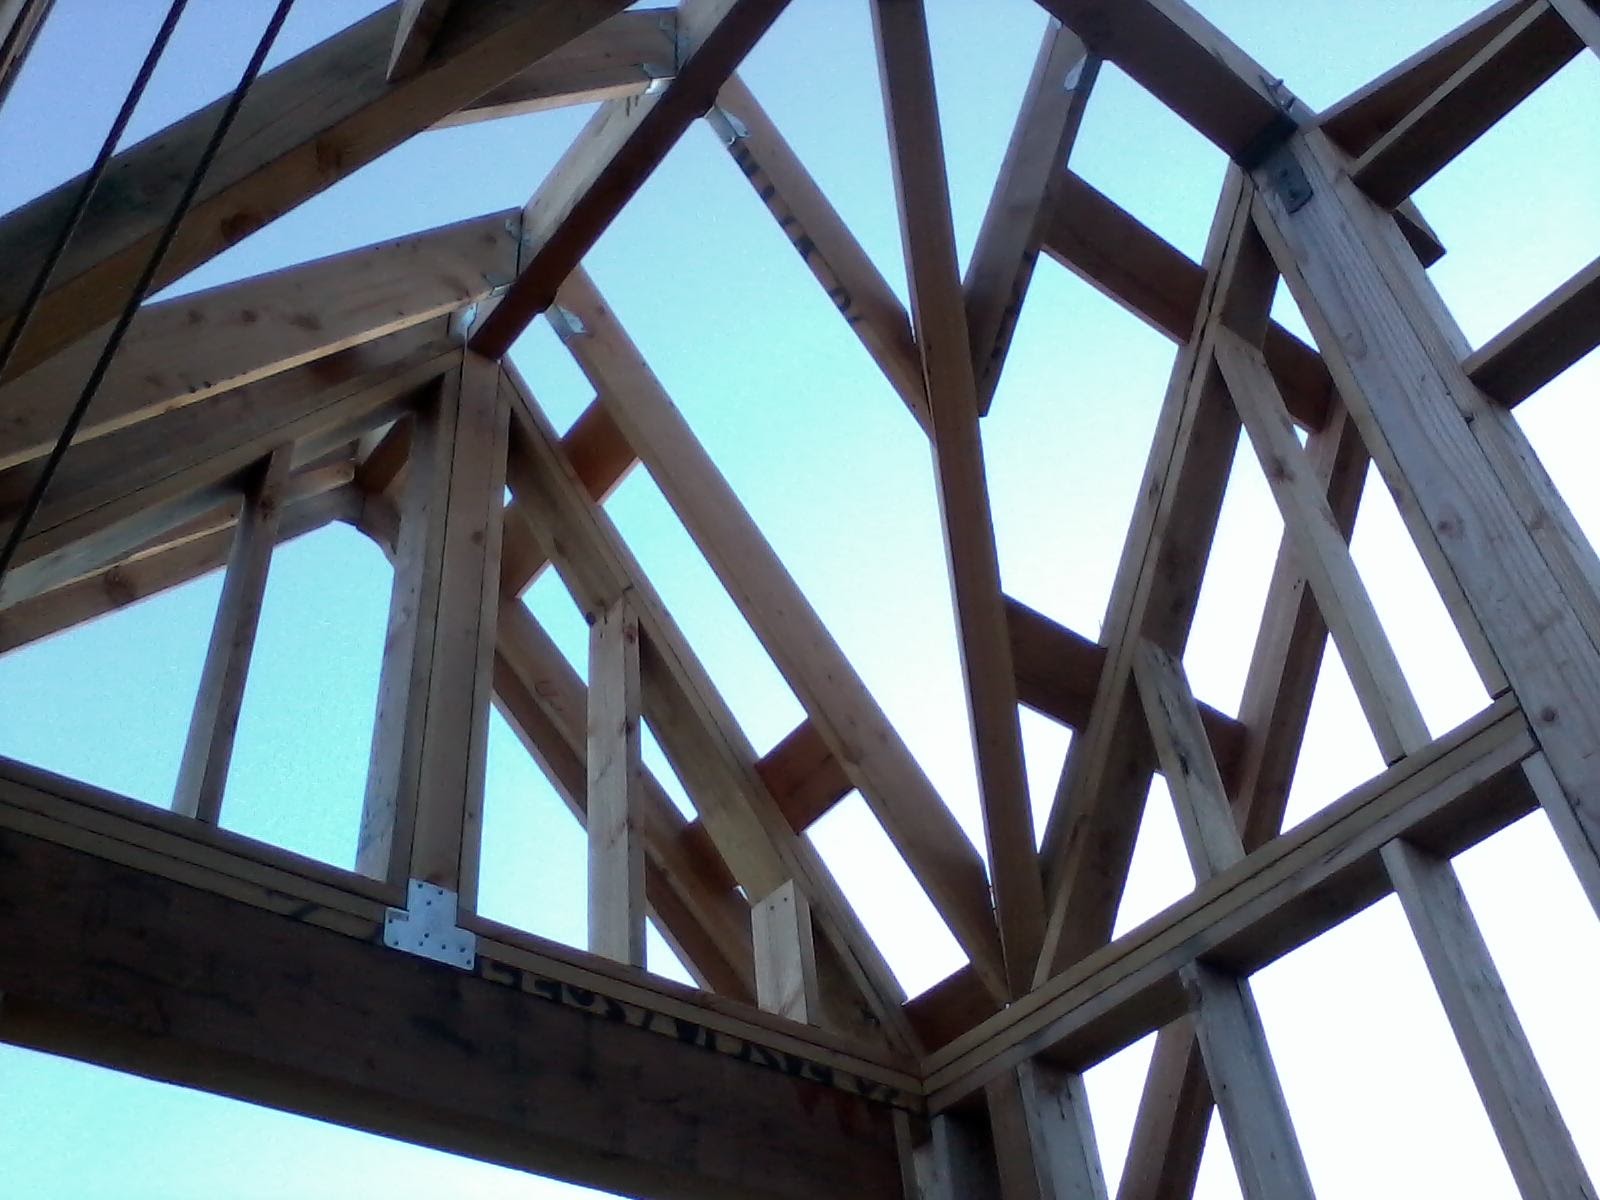
Framing is all done! Kind of bittersweet as framing is my favorite part of the project. There's progress seen at the end of each day, there's figuring out stuff to do, and the near primordial need to work with wood. The other primodial need to not fall down is a reason to be glad to move on....
I really didn't like how the porch roof terminated at the ends as I drew them for the plans...They just sort of stopped at the wall, and since the eave sticks out 16" it looked funny. So, I matched the eave mirror image to the left here, forming a peak and somewhat protecting the side window from the weather. It breaks up the monotonous look of the big wall some and should stiffen it up (this wall faces the prevailing winds). It was probably stiff enough before but the way our house can shake in high winds, a little extra perpendicular sheer won't hurt.
This was the real head scratcher.....I had to build a box to hold the tankless water heater. I wanted to put it equal distance between the kitchen and bathroom, which would have looked funny just sticking out of the wall. Once again, the porch roof was supposed to just end at the wall corner. So with the box and flue channel built, the end fascia extends up to the box then continues down the other side. It shelters the kitchen window and adds interest to the back of the house. I really struggled with how long to make the sweep going to the right---at first it was barely wider than the box, then played with making it symetrical like the other end....(decided against that. It might have looked as if the house was originally a single story house that had a jutting upstairs addition forced upon it) so opted for just over the kitchen window and below the upstairs hallway window.
Next is housewrap and installing windows. Windows can be a one person job, if they are very small and close to the ground. None of mine are so I'm gonna get help. When I called Byron and asked for help installing windows, he sounded pretty eager. Now I'm wondering if he thinks it's a computer issue. I should have been more clear.
Monday, June 27, 2011
Saturday, June 18, 2011
Why Nothing Got Done on the Cabin Today
First off, we had a request from a couple for a long term rental agreement for the other cabin. He's a land surveyor for SDG&E's big 'Sunrise Powerlink' project (kind of a sore subject with people who will have a view of new powerlines, but necessary infrastructure I think) so when I got home from work I was going to put the kids in the old truck, and drive over to clear a bunch of stuff out of the place.
Truck wouldn't start. The kids were a bit distraught----they knew the truck wouldn't last forever, and thought maybe this was goodbye. We bought it shortly after we were married and before we had any kids...Anyway, it had been sitting for awhile and all it needed was a can of carb cleaner sprayed through and it ran great.
With THAT done, and the cabin made ready for the renters (with lots of help from the kids) there was a Cuyamaca Lake issue that required some attention and a trip to town. So jumped in the Subaru--AnnaMarie and the kids just got back from a trip to Camarillo, and she told me she heard the fanbelt squeal when she had started it up...Odd, since I had just adjusted it....Well, the car started just fine, but all the warning lights were on and the power steering wasn't working. A check under the hood showed one belt VERY loose and the other belt lying in the driveway....Thank God it did it after she parked, at home, instead of somewhere on the road.
It was weird, though. All the belt pulleys seemed right, the belts looked fine, everything turned OK. Why would BOTH belts have an issue though? There's only one pulley they share, the one on the end of the crankshaft...Gave that a good yank and the pulley itself came apart. The outer ring had delaminated from the middle part. There's a rubber ring between the two, probably due to some harmonics issue or something.
The thought of having the car towed an hour away for the fix sounded expensive so got to work pulling out the radiator just to get at it. The main bolt came out without too much trouble but pulling the wheel was another matter---everything around it is plastic shrouds so there's nothing to pry against. So, pulling, wiggling, and grunting, it gave just enough to let me know it'd come off if I just kept at it.
"Yeah, we have them in stock. $189. They're notorious for delaminating like that. You'll never get the wheel off without the special tool though" Uh, I already did. "If the woodruff key is intact then it's an easy fix from here" (Nothing wrong with the key) So when I get home from work tomorrow I just have to put the new one on and button everything up and it SHOULD be good to go
Truck wouldn't start. The kids were a bit distraught----they knew the truck wouldn't last forever, and thought maybe this was goodbye. We bought it shortly after we were married and before we had any kids...Anyway, it had been sitting for awhile and all it needed was a can of carb cleaner sprayed through and it ran great.
With THAT done, and the cabin made ready for the renters (with lots of help from the kids) there was a Cuyamaca Lake issue that required some attention and a trip to town. So jumped in the Subaru--AnnaMarie and the kids just got back from a trip to Camarillo, and she told me she heard the fanbelt squeal when she had started it up...Odd, since I had just adjusted it....Well, the car started just fine, but all the warning lights were on and the power steering wasn't working. A check under the hood showed one belt VERY loose and the other belt lying in the driveway....Thank God it did it after she parked, at home, instead of somewhere on the road.
It was weird, though. All the belt pulleys seemed right, the belts looked fine, everything turned OK. Why would BOTH belts have an issue though? There's only one pulley they share, the one on the end of the crankshaft...Gave that a good yank and the pulley itself came apart. The outer ring had delaminated from the middle part. There's a rubber ring between the two, probably due to some harmonics issue or something.
The thought of having the car towed an hour away for the fix sounded expensive so got to work pulling out the radiator just to get at it. The main bolt came out without too much trouble but pulling the wheel was another matter---everything around it is plastic shrouds so there's nothing to pry against. So, pulling, wiggling, and grunting, it gave just enough to let me know it'd come off if I just kept at it.
"Yeah, we have them in stock. $189. They're notorious for delaminating like that. You'll never get the wheel off without the special tool though" Uh, I already did. "If the woodruff key is intact then it's an easy fix from here" (Nothing wrong with the key) So when I get home from work tomorrow I just have to put the new one on and button everything up and it SHOULD be good to go
Sunday, June 12, 2011
Lauren's Gettysburg Poem
OK. If you had told me I'd be posting 14 year old girl poetry on MY blog, I'da thought you were nuts....
Lauren's class was returning from a field trip and yet another very impressive teacher used the long bus ride having the kids memorize the Gettysburg Address (in honor of memorial Day). Back at school the kids were asked to produce a poem about it. Anything. Most were the 'Roses are Red' variety. This was Lauren's.
Never Forget What They Did Here
A call
An idea
“I’ll fight”
Added Enthusiasm
“For my country”
A decided expression
“For the People”
A command
A whine
“Life would be easier”
A grumble
“If slaves could do our chores”
A grimace
“For the People”
A departure
A cry
“Leave my family”
A sob
“For my country”
A kiss goodbye
“So nobly advanced”
A slamming door
A shout
“Wish I didn’t have to go”
A huff
“To school”
An ignored goodbye
“So nobly advanced”
A cold tent
A frosty breath
“I’m a brave soldier”
A determined nod
“I’ll follow through with this”
A stretch
“Fitting and proper that we should do this”
A warm comforter
A sigh
“I won’t get up”
A yawn
“There’s nothing to do”
A doze
“Fitting and proper that we should do this”
A fear
A thumping heart
“I may die”
A coordinated step
“In battle”
An acceptance
“The brave men”
A whimper
A stubborn refusal
“I won’t”
A stomp
“Eat this broccoli”
A tantrum
“The brave men”
A halt
A silence
“I hope I’m ready”
A gulp
“My country’s counting on me”
A forward march
“Great battlefield of that war”
A check
A sulk
“you’ll beat me”
A sniff
“You always win”
A surrender
“Great battlefield of that war”
A gunshot
A passing thought
“My country”
A labored breath
“Will thank me”
A throbbing pain
“Shall not perish from this earth”
A foul ball
A wince
“My team would be better”
A hung head
“Without me on it”
A resignation
“Shall not perish from the earth”
A deadly field
A survivor
“How brave they were”
An admiration
“To die”
A tear
“Shall not die in vain”
A computer game
A champion
“I won”
A prideful smile
“And you lost”
A sneer
“Shall not have died in vain”
An address
A live listener
“How true”
A hope
“We must carry it out”
An agreement
“Never forget what they did here”
A history book page
A student
“How true”
A hope
“We must carry it out”
An agreement
“Never forget what they did here”
A command
An obeyed
“For the People”
A slamming door
An apology
“So nobly advanced”
A warm comforter
An awakening
“Fitting and proper that we should do this”
A whimper
A courageous bite
“The brave men”
A check
A defensive move
“Great battlefield of that war”
A foul ball
A second try
“Shall not perish from the earth”
A computer game
A modest winner
“Shall not have died in vain”
Lauren's class was returning from a field trip and yet another very impressive teacher used the long bus ride having the kids memorize the Gettysburg Address (in honor of memorial Day). Back at school the kids were asked to produce a poem about it. Anything. Most were the 'Roses are Red' variety. This was Lauren's.
Never Forget What They Did Here
A call
An idea
“I’ll fight”
Added Enthusiasm
“For my country”
A decided expression
“For the People”
A command
A whine
“Life would be easier”
A grumble
“If slaves could do our chores”
A grimace
“For the People”
A departure
A cry
“Leave my family”
A sob
“For my country”
A kiss goodbye
“So nobly advanced”
A slamming door
A shout
“Wish I didn’t have to go”
A huff
“To school”
An ignored goodbye
“So nobly advanced”
A cold tent
A frosty breath
“I’m a brave soldier”
A determined nod
“I’ll follow through with this”
A stretch
“Fitting and proper that we should do this”
A warm comforter
A sigh
“I won’t get up”
A yawn
“There’s nothing to do”
A doze
“Fitting and proper that we should do this”
A fear
A thumping heart
“I may die”
A coordinated step
“In battle”
An acceptance
“The brave men”
A whimper
A stubborn refusal
“I won’t”
A stomp
“Eat this broccoli”
A tantrum
“The brave men”
A halt
A silence
“I hope I’m ready”
A gulp
“My country’s counting on me”
A forward march
“Great battlefield of that war”
A check
A sulk
“you’ll beat me”
A sniff
“You always win”
A surrender
“Great battlefield of that war”
A gunshot
A passing thought
“My country”
A labored breath
“Will thank me”
A throbbing pain
“Shall not perish from this earth”
A foul ball
A wince
“My team would be better”
A hung head
“Without me on it”
A resignation
“Shall not perish from the earth”
A deadly field
A survivor
“How brave they were”
An admiration
“To die”
A tear
“Shall not die in vain”
A computer game
A champion
“I won”
A prideful smile
“And you lost”
A sneer
“Shall not have died in vain”
An address
A live listener
“How true”
A hope
“We must carry it out”
An agreement
“Never forget what they did here”
A history book page
A student
“How true”
A hope
“We must carry it out”
An agreement
“Never forget what they did here”
A command
An obeyed
“For the People”
A slamming door
An apology
“So nobly advanced”
A warm comforter
An awakening
“Fitting and proper that we should do this”
A whimper
A courageous bite
“The brave men”
A check
A defensive move
“Great battlefield of that war”
A foul ball
A second try
“Shall not perish from the earth”
A computer game
A modest winner
“Shall not have died in vain”
Tuesday, June 7, 2011
Getting Ready for Rough Framing Inspection
There's a lot going on here....There are quite a few requirements to be met since this is a high fire danger (Wildland Urban Interface) area, high earthquake danger area, and high wind/weather extremes zone. Add to that it's built on a slope and is taller than it is wide. To satisfy all the inspectors, there has to be radiant barrier everywhere higher than the ceiling. All the timbers have to be oversized. I spend more time putting in the required steel reinforcement strong ties than the framing----note the steel strips above and below the windows running the entire wall width---they have one 3" nail per inch. That's a lot of hammering. Plus you have to provide the blocking to nail the strips to. There's another row of blocking studs just behind the top of that sheer panel, so the ledger for the porch roof has something to attach to later.
Here's the tallest wall. I tried to put up the sheer panel just using a ladder but after falling I decided that was stupid. Actually if there wasn't any wind I could probably do it. So I made four braces I can screw to the wall temporarily to have something to stand on to work safely. (as of this writing they are on the other side of the house so I can finish the sheer on that side when I get back home again)
The upstairs picture window......Ugh. When framing that wall I realized part of the window's view would be blocked by the interior chimney so I just scooted the window over a little. Now from the outside, it isn't centered with the gable roof peak. So far no one I've pointed it out to seems to think it looks bad.
There are two solutions---option One is frame in and eliminate part if the window on the left so it's visually centered----but losing the best of the view from inside. Option B is a stone veneer on the outside, to the right of the window opening, continued on the porch wall, all the way down to the foundation. Added benefit is, water coming off the roof from the gable would run down stone instead of siding.
Before the inspection I have to install the fire sprinklers, all the windows, and doors. I could put the roof on too. Right now I'm working 10 days straight (the two other HRM's took vacations) but I'll get time off with good weather soon so work will continue. The wood pile is down to almost nothing. AnnaMarie likes the idea of having her whole driveway back again.
Here's the tallest wall. I tried to put up the sheer panel just using a ladder but after falling I decided that was stupid. Actually if there wasn't any wind I could probably do it. So I made four braces I can screw to the wall temporarily to have something to stand on to work safely. (as of this writing they are on the other side of the house so I can finish the sheer on that side when I get back home again)
The upstairs picture window......Ugh. When framing that wall I realized part of the window's view would be blocked by the interior chimney so I just scooted the window over a little. Now from the outside, it isn't centered with the gable roof peak. So far no one I've pointed it out to seems to think it looks bad.
There are two solutions---option One is frame in and eliminate part if the window on the left so it's visually centered----but losing the best of the view from inside. Option B is a stone veneer on the outside, to the right of the window opening, continued on the porch wall, all the way down to the foundation. Added benefit is, water coming off the roof from the gable would run down stone instead of siding.
Before the inspection I have to install the fire sprinklers, all the windows, and doors. I could put the roof on too. Right now I'm working 10 days straight (the two other HRM's took vacations) but I'll get time off with good weather soon so work will continue. The wood pile is down to almost nothing. AnnaMarie likes the idea of having her whole driveway back again.
Friday, June 3, 2011
Boat Launch 2011
After a one year hiatus, Mr. Copeland's 7th and 8th grade class built and launched a boat, this time an outrigger. It's a great way to end the school year, with a big beach party.
One of the crew chiefs at work has a son that reps for a stand-up paddle board company. He and his friend brought some boards out and gave lessons---it was a hit and good addition to the event.
Not exactly sure why McKenna was so anxious for a stand up paddle lesson. She never expressed an interest in it before...
So after Riley and Eric put in a few hours with the kids, they took the outrigger out for a paddle. They really got the thing moving.
One of the crew chiefs at work has a son that reps for a stand-up paddle board company. He and his friend brought some boards out and gave lessons---it was a hit and good addition to the event.
Not exactly sure why McKenna was so anxious for a stand up paddle lesson. She never expressed an interest in it before...
So after Riley and Eric put in a few hours with the kids, they took the outrigger out for a paddle. They really got the thing moving.
Then, of course, the obligatory group photo
Wednesday, May 25, 2011
Saturday, May 21, 2011
Roof Sheeting
There are quite a few steps in this project that are basically question marks. If I'm really not sure how to get over some hurdle, I try to get everything done up to the point of the roadblock and reduce it to a single question.
How do you cut an irregular triangle the right size for a gable that's 28' off the ground?
The other issue is this radiant barrier stuff. It's like extra thick bubblewrap with mylar on both sides. It reflects 96% of the radiant heat and helps make it a very efficient 'green' building.
The underside, looking up. You can tell how high the ceiling's gonna be by the ceiling joists. If you ever work around that radiant barrier stuff wear sunglasses
How do you cut an irregular triangle the right size for a gable that's 28' off the ground?
The other issue is this radiant barrier stuff. It's like extra thick bubblewrap with mylar on both sides. It reflects 96% of the radiant heat and helps make it a very efficient 'green' building.
So I climbed up with a piece of this radiant barrier, tacked it in place, and trimmed it to shape. Took it back down and used it as a template for cutting the sheeting.
Just getting the lumber up there was hard. YOu sort of cradle it in your arms while shimmying up the ladder. With the wind you have to be careful and be willing to drop a carefully cut piece if need be.
The only part left is the curved rafters for the kick-out over the bedroom and that will be pretty easy compared to the gable.
The underside, looking up. You can tell how high the ceiling's gonna be by the ceiling joists. If you ever work around that radiant barrier stuff wear sunglasses
Sunday, May 8, 2011
Interior Framing
Had a particularly productive day yesterday. The paying job will demand most of my attention for awhile so I really wanted to get as much done as I could. Started at sunrise then started cleanup at sunset...Got the bathroom rough-framed in. Lesson learned from before---buy the tub early and frame around it.
Started to get the ceiling joists in---I really struggled with how high to make the ceiling. Lower is warmer and cozier--it also makes the overall structure stronger . Higher makes it feel bigger. After consulting a trusted source, decided on 107" from the floor. With the joists in I can picture the room now. It's a smallish bedroom so too high would have felt like a hallway. I'm happy with it.
The roof is all framed up now. Getting the outside fascia in place was hard because they are heavy, require weird cuts, and are way off the ground. It took a full day just to install ONE of them. By contrast, all the upstairs interior framing, installing the bathtub, and getting some of the ceiling joists in took the same amount of time. When there's no real risk of falling you can work a lot faster. Framing is by far the most fun and most rewarding stage of building. Too bad it goes by so darned fast. I was sort of in an Irish music mood too---maybe because everything's so lush right now thanks to the rains. Framing, and Irish music. Slice of heaven.
Tuesday, May 3, 2011
Rafters
Yesterday the last of the rafters were installed. There are two fascia boards that sort of match the rafters that will go in tomorrow--those funny cuts out of the outside rafters are to cradle 'bachelor studs' that support the fascia since they don't rest on the wall. there's going to be a really funny cut where this fascia meets up with the front one too, which means lifting it up, marking it, taking it down, cutting it, lifting it back up again.
Friday, April 29, 2011
Taking Shape
Had three days in a row to pretty much just build---all in really good weather. AnnaMarie kicks me out early but as a courtesy to the neighbors no power tools until 7:00 am. Sometime around 11 she'll call me home and we'll have lunch together, then back at it until sunset. It takes a little while to put things away for the night. Then shower, help with homework, visit, eat dinner, then off to bed---typically with a few things to figure out for the next day.
All the steep rafters with compound angles are in. All the curved rafters, too. The rafters on the back side are pretty simple, just an angle where they meet the beam, a birds-mouth cut where they rest on the wall frame, and an angle on the rafter tail for the soffit later. I have 5 out of 11 of those in--should be able to finish that tomorrow if I get off work at a reasonable time. The back upstairs wall was plumb on the two ends but about 2" off in the middle, so it got pulled into shape and held there with a board until the rafters are in place to secure it (if you don't do this, the wall is forever held in the wrong position. Doors and windows stick, pictures don't hang straight, all sorts of bad building karma)
We're slowly regaining our driveway, too. What had been three semi truckloads of building materials in our home's driveway, eating up three parking spots, is now down to a little stack. I'm going to have a fair amount of wood left over. Maybe for a single car garage, which would be nice
Here's the boards that become the long rafters. They're 20' long 2x12's (80-100 pounds each) The old truck just keeps chugging along. It isn't a far trip---across the street---but then up a very steep driveway.
All the steep rafters with compound angles are in. All the curved rafters, too. The rafters on the back side are pretty simple, just an angle where they meet the beam, a birds-mouth cut where they rest on the wall frame, and an angle on the rafter tail for the soffit later. I have 5 out of 11 of those in--should be able to finish that tomorrow if I get off work at a reasonable time. The back upstairs wall was plumb on the two ends but about 2" off in the middle, so it got pulled into shape and held there with a board until the rafters are in place to secure it (if you don't do this, the wall is forever held in the wrong position. Doors and windows stick, pictures don't hang straight, all sorts of bad building karma)
We're slowly regaining our driveway, too. What had been three semi truckloads of building materials in our home's driveway, eating up three parking spots, is now down to a little stack. I'm going to have a fair amount of wood left over. Maybe for a single car garage, which would be nice
Here's the boards that become the long rafters. They're 20' long 2x12's (80-100 pounds each) The old truck just keeps chugging along. It isn't a far trip---across the street---but then up a very steep driveway.
Monday, April 18, 2011
Dihedrals
There were a few challenges with the gable. One was working 28' off the ground, and it gets pretty windy in the afternoon. Dealing with compound angles is a headscratcher sometimes (OK always)...Another problem was, the valley beam doesn't come out over the corner of the house and that makes the eaves not match up. So either one eave is a lot bigger than the other (which would look funny) or where the eaves meet at the valley beam one extends out more than the other (which would look funny). So the fascia on the gable actually angles back from the standars 16" down to 4" so everything meets up.
The wall to the left has a big window in it---it's boarded up now to keep snow from blowing in. It didn't help much. The roof framing to the far right is the first curved rafters---that same curve will be matched for the porch roof.
Here's the gable roof framing looking up from the second floor. You can see how that valley beam doesn't pass over the corner. The rafters must, by code, oppose each other on either side of the ridge and valley so you have to get the angles correct. The boards going perpendicular are called bachelor studs---they support the fascia boards that are cantilevered out. The column to the right, one of five in the house, has to be supported all the way down to the foundation and the foundation underneath is deeper, wider, and reinforced with more steel to support the load of the house.
When people imagine building, I think this is the stage they think of. It is probably the most fun and rewarding stage as you really see progress at the end of each day. But it actually represents a very tiny fraction of the overal building process.
The wall to the left has a big window in it---it's boarded up now to keep snow from blowing in. It didn't help much. The roof framing to the far right is the first curved rafters---that same curve will be matched for the porch roof.
Here's the gable roof framing looking up from the second floor. You can see how that valley beam doesn't pass over the corner. The rafters must, by code, oppose each other on either side of the ridge and valley so you have to get the angles correct. The boards going perpendicular are called bachelor studs---they support the fascia boards that are cantilevered out. The column to the right, one of five in the house, has to be supported all the way down to the foundation and the foundation underneath is deeper, wider, and reinforced with more steel to support the load of the house.
When people imagine building, I think this is the stage they think of. It is probably the most fun and rewarding stage as you really see progress at the end of each day. But it actually represents a very tiny fraction of the overal building process.
Subscribe to:
Posts (Atom)